Reader Shot of the Month - Using Tinted Filters

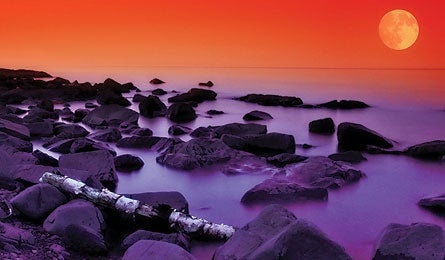
'Lake Superior (Photo by Amanda Allard)'
Are the vivid colors in this photo of Lake Superior real? No, but they weren’t Photoshopped, either. Shooter Amanda Allard, of Duluth, Minnesota, employed one of Ansel Adams’s favorite tools: a tinted filter. Here’s how you can get a similar shot.
Choose your color Tinted filters sit in front of the lens and block certain wavelengths of light, resulting in a color shift in the final image. Ansel Adams often used yellow and red filters to darken blue skies. Here, Allard used a graduated orange filter (Gradual Fluo Orange 2; $23; cokin.fr) to create an apricot sky and leave the bottom of the photo unchanged.
Pick the right focal length For the moon to appear huge, you need a long focal length. Anything less than 200mm and it’ll just be a little white dot. Allard zoomed all the way in with a Canon EF 100-400mm lens on a Canon Rebel Xsi. Like most entry-level DLSRs, it has a smaller sensor size than a 35mm camera—making the effective focal length about 600mm. So the moon hovered large while still leaving room for the horizon and shoreline.
Use a tripod Allard used a somewhat slow shutter speed (1/50 second) to capture the waves’ motion. You don’t always need a tripod for that speed, but with such a long focal length, 1/50 is slow enough that you’ll get camera shake if you handhold it. Don’t forget the other moving object: the moon. Shutter speeds slower than 1/30 second will blur it.