Updated July 3, 2025 12:03PM
Navigation 101: Understanding Your Compass
If you don't know what triangulation is, read this article.
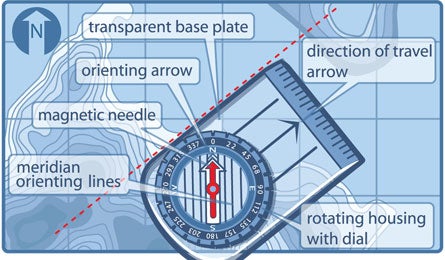
'Compass'
Interested in improving your navigation skills? Join Backpacker’s Backcountry Navigation or Basic Map and Compass Skills online course today.
The only place you’re likely to find a big red “YOU ARE HERE” sign on a mall map, so before you can make use of a topographic map, it must be oriented properly to your surroundings. Knowing which direction North is isn’t enough–you must also find your own position on the map
That act of figuring out where you are in relation to a map is called triangulation, a long-winded term for using at least two recognizable landmarks to pinpoint your own position. To triangulate properly you will need a compass, a ruler and a pencil or pen.
Before you leave the house, prepare your map.
ADVERTISEMENT
Find the declination diagram at the bottom of your map.
- Align your ruler along the line labeled “MN,” which stands for magnetic north. Using pencil, extend that line from the bottom to the top of the map.
- Draw parallel lines every 1.5 inches on both sides of this line all the way across the map.
It’s not necessary to draw lines across the entire map ~ just do the sections you’re actually going to use.
In the field, identify at least two landmarks that you see and locate them on the map.
Look for easily identifiable features such as peaks, clearings, lakes, ponds, roads, rivers and buildings. Scan the map carefully until you find two (preferably three) such distant landmarks.
The second landmark should be at a right angle to the first as you look at them in the field; the third should fall between these two.
ADVERTISEMENT
Mark these landmarks on your map if necessary so you don’t “lose” them.
Align your map to your surroundings.
Spread the map out flat.
- Set the compass dial to North (0 degrees).
- Lay the compass on top of the map and align one long side of the baseplate along one of the magnetic north lines you added.
- Turn both map and compass together until the red end of the needle is on the “N.” The top of the map now points to true north.
Align your map to a landmark.
- Pick up the compass.
- Point the direction of travel arrow at the first landmark you chose in the field, in this case the north end of the lake down in the valley in front of you.
- Rotate only the dial until the red end of the needle points again to North. Hold the baseplate still at this time, keeping it pointed at the landmark.
- Put the compass back on the map with one long baseplate edge touching the landmark.
- Carefully pivot the entire compass until the orienting lines inside the compass housing are parallel with the magnetic north reference lines you drew before you left home.
- Draw a five or six-inch line from the landmark along the edge of the baseplate.
Triangulate your position.
Repeat steps 1-6 above under Align Your Map To A Landmark.
Your approximate location will be where the 2 lines cross.
To further verify your location, select a third landmark between the first two and repeat steps 1-6. This third line should pass through the intersection of the first two lines to confirm your position. If not, recheck your work for all three landmarks.
I see a stream on my map. How do I find it in the real world?
You may encounter a situation where you can see a choice location on a map, but because the terrain around you blocks the view (high trees, rolling hills, riverbeds and so on), you can’t see it in “real life.”
After you oriented yourself to the map, you can easily judge the location of a landmark in the field even if you can’t see it.
ADVERTISEMENT
Mark both your current location and destination.
Lay one side edge of the compass baseplate on the map, aligned with these two points. (The direction of travel arrow should be pointing toward the goal, not away from it.)
Holding the baseplate steady on this line, turn the dial until the needle and the orienting arrow line up.
Read the bearing at the marker line.
Pick up the compass and map with the needle still aligned with the orienting arrow, follow the direction of travel line with your eyes. It is now pointing to the object you wish to find in the field.
Getting from here to there, however, probably won’t be a simple matter of walking in a straight line. To learn how to navigate around obstacles without losing your way.
I see a peak up ahead. How do I find it on the map?
If you know your position on a map, you can use a compass to identify landmarks in the field.
Let’s say you’re on a mountain peak, and you’d love to identify a nearby summit so you can brag to your friends back home about the view. Nothing to it!
- Orient the map.
- Draw a straight line connecting your current location with the summit you want to identify.
- Place one side edge of the baseplate on this line, with the direction of travel arrow pointing toward the summit on the map.
- Turn the dial until the orienting arrow and the north end of the compass needle are lined up. Read the bearing, which is the number on the dial at themarking line.
- Pick up the compass and, after making sure the orienting arrow and needle are still aligned, sight along the bearing. The direction of travel arrow now points to your peak.
- Doublecheck your work visually by making sure that the terrain around the object you identified on the map matches the terrain around the object in the field.
How do I navigate around this huge bramble patch without getting lost?
Following a compass bearing is hard enough, but nature makes it even more difficult by throwing up obstacles that block your nice straight line. Marshes, ponds, boulders, trees, cliffs, steep slopes, brambles and dense foliage can all thwart hikers trying to follow a straight course. Sometimes, you’ll soon find, the shortest distance is not the easiest.
Planning your route in advance helps here. If you know ahead of time, for example, that an outcropping of rock lies between your campsite and that cave entrance, study your topographic map and plot a route around it.
ADVERTISEMENT
But you never know when your path will be unexpectedly blocked ~ by a fallen tree, a washed out bridge, an unmapped quarry ~ forcing you to navigate around without benefit of planning. Here’s how.
- Sight ahead while you’re walking in order to identify landmarks along your compass bearing. For example, say you’re truckin’ along a bearing of 270 degrees (due west) and you encounter a huge fallen tree. Before moving around it, sight along 270 degrees ahead of you and note a conspicuous landmark ~ tree, rock, or other easily identified point ~ on the opposite side of the log that’s at the same bearing.
- After detouring around the downed log, go to the landmark you noted earlier and resume your previous course of 270 degrees.
- Here’s another technique called “right angle navigation.” We’re back at the downed tree again and want to navigate around it on a bearing of 270 degrees (due west).
- Turn 90 degrees from your bearing. In this case, you decide to turn left, (due south). Turn the dial so the direction of travel arrow and the marking line point to 180 degrees.
- Begin your detour. Carefully count your paces as you go.
- As soon as you clear the tree, turn 90 degrees back toward your previous bearing. In this case, you’d turn right (due West) again, back to 270 degrees. Rotate the compass dial to match that bearing.
- Walk past the obstacle.
- Turn 90 degrees to the right, this time in the opposite direction of your first turn, and rotate the compass dial again; in this case, you’d rotate it to 360 degrees (due north).
- Walk back along the other side of the log, counting off the number of steps you walked the first time you turned. This will return you to your original course.
- Turn 90 degrees left to 270 degrees, your original bearing (due West).
The key to making this technique work is keeping out and back portions of the detour equal in length. Keep close track of the number of paces you walk, and keep your strides as uniform as possible.
How do I measure hiking distance accurately on a map?
“Linear distance” and “travel distance” are almost never the same in the backcountry. “As the crow flies,” in other words, “ain’t as the hiker walks.”
If you’re trying to estimate how many miles you have ahead of you, measuring the distance straight from point A to point B won’t do you any good ~ because unless you’re actually a crow, the route you take will likely follow a more roundabout path.
ADVERTISEMENT
To measure actual or nonlinear distance on a topographic map–of a winding trail, say, or a meandering creek ~ use one of these two methods. (Note that the Paper Method does not work very well on the trail.)
String Method
- Find something long and flexible, such as a piece of string or dental floss. An item that retains its shape is even better ~ a twist-tie or pipe cleaner, perhaps.
- Place one end of the twist-tie at the starting point.
- Use your fingers to conform the twist-tie to the shape of your route.
- Mark the end of the route on the twist-tie with your thumb and forefinger, or give it a sharp crimp.
- Straighten it out and lay it down next to the bar scale at the bottom of the map to read the distance.
Note: If you’re using string or something that won’t keep its shape, always keep it anchored with one finger as you move forward. Otherwise, if the string slips you’ll have to start over again. Also, don’t stretch the string when you straighten it out.
Paper Method
- Find a thin strip of paper about a foot long.
- Align the edge of one end of the paper with your starting point. Make a tick mark there.
- Now rotate the paper gently to follow the bends in the trail, making tick marks at significant turns until you reach the end point.
- Lay the paper along the bar scale and read the distance.
Some guidebook maps will have a numerical scale ~ such as “one inch equals one mile” ~ indicated in the legend, but no accompanying bar scale. In a case such as this, measure the distance with a ruler (there’s a small one on the baseplate of your compass) and multiply that number by the scale. A distance of 3.75 inches on a map with a “one-inch-equals-one-mile” scale would represent 3.75 miles on the ground.
Return to the Backpacking 101 home page.