Gear School: Snowshoes

'october 2010 gear school snowshoes 200x170'
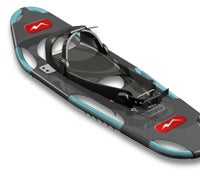
A. Crampons
Sharp points under the heel and toe increase traction on hardpack snow and ice. Teeth on the frame enhance grip on uneven terrain, but about 90 percent of the traction comes from the underfoot crampons.

B. Heel lifts
Aka ascenders or climbing bars, these hinged supports allow an easier stride on steep slopes.
C. Frame shape
Oval designs increase flotation, while diamond and hourglass shapes allow a more natural stride, as they position your feet closer together.
Shop
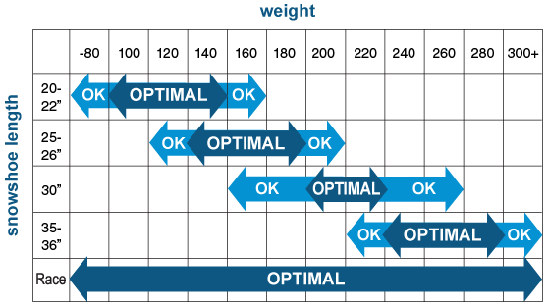
>> Size A snowshoe’s length and width determine the amount of flotation. You want more flotation for more body weight and for deeper, softer snow. The heavier you and your pack are, the wider and longer your ’shoes should be. Narrower, shorter ones are best for dayhikes on packed snow. (See chart below; If you spend most of your time in fresh snow or on big-load treks, add your pack weight to your body weight.)

>> Frame Choose featherweight aluminum (more durable) or hard plastic (less expensive). See above for shape information.
>> Decking The cover across the frame is typically made of hard plastic or softer synthetics like neoprene. “The materials are so durable,” says Carl Heilman, a snowshoe-design consultant for several manufacturers. “They can take a beating. Wear and tear isn’t much of an issue.”
>> Crampons Most snowshoes have a claw-style crampon under the foot platform. You want points angled in all directions for the best grab. Some ’shoes also have frame crampons for steep and icy terrain. Stainless steel works best for rocky conditions; for snow-only hikes, aluminum is fine. You want the points long enough to grip the surface, but not so long that they catch or trip you.
>> Bindings The straps or molding that wraps around your boots should provide a secure and stable attachment. Bring the boots you snowshoe in to the store, and make sure the binding mechanism is easy to operate and fits snugly around the tops of your feet and your heels.
>> Pivot point Situated under the ball of the foot, this lets your foot move up and down naturally. With fixed rotation models, the ’shoe also lifts up some with each step, making it easier to back up and step high, but flipping up snow. With free rotation, the foot fully pivots, which facilitates climbing and means you lift less weight with each step.
USE
>> Striding Keep your feet a little wider apart than usual to avoid overlapping or colliding snowshoes. Use trekking poles to aid balance.
>> Ascending When hiking uphill in soft powder, kick your snowshoes toe-first into the snow to create a step; in hard snow, rely on your crampons—the binding’s pivot point will let you walk straight up moderate slopes with your ankle in a comfortable position.
>> Descending Bend your knees so your weight shifts slightly backward, and rely on your crampons for traction. In soft and hard snow, you can walk down moderate slopes without traversing.
>> Traversing Jam the side of the snowshoe into the snow and lean into the slope slightly. “Keep the ’shoe as level as possible,” Heilman says.
>> Bridging Never use the snowshoes to straddle a gap between rocks or the limbs of a fallen tree; you risk snapping the snowshoe frames.
FIX
Carry a multitool so you can tighten screws or make other repairs. Use tent repair patches or duct tape to patch minor tears in the decking; if it rips off the frame, use plastic zip ties or a hose clamp for a field fix.
Credits: David Pidgeon (text), Don Foley (illustration), Sierra Trading Post (sizing chart)