Survive Coastal Dangers

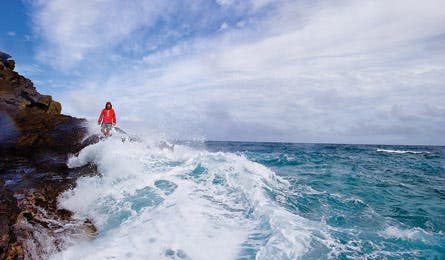
'Killer Wave (Photo by: Will McPherson)'

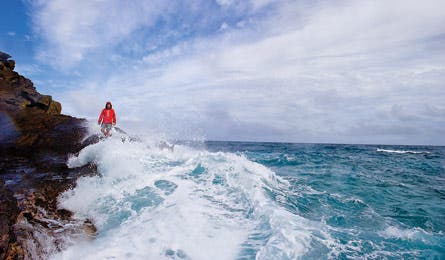
Killer Wave (Photo by: Will McPherson)

Killer Wave (Photo by: Will McPherson)

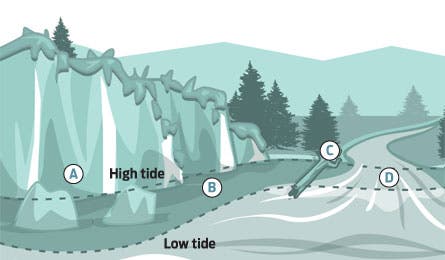
Tide (Illustration by: Supercorn)
AVOID KILLER WAVES
NAVIGATE A HEADLAND
READ THE SURF
SPOT HIDDEN HAZARDS
GEAR UP
ESCAPE RIP CURRENTS
AVOID KILLER WAVES
Prevent a surprise encounter with these giants.
>> Storm surges and swells winds and low atmospheric pressure can force water ashore, generating a surge, extreme high tides, and enormous swells that compound the danger of storm surf. Monitor weather-related tidal shifts pretrip by visiting NOAA’s National Hurricane Center website (nhc.noaa.gov) for surge predictions and inquire with rangers about hazardous areas. If a storm threatens, move to high ground; dangerous surf and tides may last several days.
>> Rogue waves These giant swells are formed when waves collide and combine. The largest rarely hit coastlines, but there’s no way to predict when a monster will (and even moderately-sized surprise waves can knock you off your feet). Scan the surf as you hike and always be prepared to climb above sea level or hold onto a big rock as a last resort.
>> Tsunamis Major undersea earthquakes can send a deadly wall of water surging ashore within minutes–or up to a day after an event on the other side of the globe. If you notice signs of seismic activity, like shifting sand, swaying trees, rockslides, or a sharply receding water level, don’t wait for an alert. Run or climb to between 50 and 100 feet above sea level and stay on high ground for at least 12 hours.
NAVIGATE A HEADLAND
Scramble over or skirt around? Here’s how to pass rocky points.
>> Calculate water levels. Tide charts show the approximate time and level of each high and low, which change daily. Note that chart accuracy is also affected by your distance from the nearest data-collection point; check with rangers to see if there’s an offset for your hiking area. Beware of storms, which can negate tidal predictions and eliminate or dramatically change the timing of extremes.
>> Follow the tide out. Start rounding a headland before low tide, following the water as it recedes. Head to safety above the tide line quickly after rounding the point. Move cautiously; rocks will be slick.
>> Consult your coastal map. Promontories marked “Caution +3,” for example, become unsafe to skirt when tides rise three feet above the average daily low (“0” on your tide chart). Headlands marked “Danger” are always dangerous or impassable via the beach or shoreline, even at extreme low tides.
>> Identify danger zones. Weathered headland edges (A) may be slick, beaches (B) sometimes disappear completely at high tide, surf-zone debris (C) can shift in waves, and rip currents often form where streams meet surf (D). Stick to trails on headlands, stay clear of beached debris, camp well above the tide line, and cross nearshore streams during outgoing tides.
>> When in doubt, take the high road. Many coastal trails have inland routes allowing passage over headlands no matter what the tide. Be careful on cliffy routes, which are often slick and may be washed out. Test existing ladders or standing ropes before using.
READ THE SURF
Anticipate wave behavior to scramble, wade, and swim with more confidence.
>> Find the set. Big waves typically arrive in distinct sets of five to eight regularly spaced swells with as much as 30 minutes between sets. Before hopping into the water, count the waves in a set and time the interval between sets. Those numbers stay generally consistent for several hours so you can loosely forecast breakers.
>> Expect change. The largest waves in a set may be five times larger than the smallest ones. “Don’t begin navigating a dangerous stretch of coastline or just drop your pack and run straight into the water for a swim thinking that what you see right away is what you’re going to get a minute–or 20 minutes–from now,” says Captain Lance Dempsey, a lifeguard for the Los Angeles County Fire Department.
>> Time your moves. Big surf strengthens rip, longshore, and undertow currents. Avoid being swept off your feet: Time your swimming or wading to avoid being in the surf zone when a set is approaching and wait for an entire set to pass before crossing beach streams or rounding points.
SPOT HIDDEN HAZARDS
Avoid these common–but hard-to-identify–nearshore and trailside dangers.
DANGER ZONE: Underwater drop-offs
HAZARDS: Waves that break twice as they reach shore may be hitting a drop-off that hides fast currents and cold water.
SAFETY TIPS: Unfasten your pack’s hipbelt while wading. If you can’t see your feet, use a trekking pole to test surfaces, and step cautiously.
DANGER ZONE: Rocky points and jetties
HAZARDS: Longshore currents, which run parallel to the beach, may bounce off of these obstacles and shoot seaward, forming a permanent rip current.
SAFETY TIPS: Swim and wade at least 100 feet away from promontories, and look toward an onshore landmark often to ensure you’re not drifting downshore or toward danger.
DANGER ZONE: Intertidal zone
HAZARDS: Slick, ankle-turning rocks, foot-trapping boulders, and shoe-sucking tideflat mud are exposed during low tide.
SAFETY TIPS: Scout intertidal zones with partners, use caution on unstable beach surfaces, and carry a trekking pole for digging or to use as a crutch.
DANGER ZONE: Surge channels
HAZARDS: These narrow canyons amplify surf. Water shoots in and out at high velocity, sweeping trees, packs, and unlucky hikers out to sea.
SAFETY TIPS: Discuss known channels and crossing strategies with a ranger before hitting the trail. When in doubt, or if tides are high, make an inland detour around the channel.
DANGER ZONE: Undertows
HAZARDS: On steep beaches, waves crest and collapse quickly and powerfully, creating a backwash that can trap you in (and under) the water.
SAFETY TIPS: Stay away from encroaching waves and above wet sand on steep beaches. Use caution crossing coastal streams, which also create undertows.
GEAR UP
Equip for a safe coastal adventure.
Water Shoes
On slick trail sections, switch to a soft-soled shoe, which won’t slip across algae-covered rocks. Try Columbia’s amphibious Powerdrain ($95; columbia.com), with a quick-draining mesh upper and sticky rubber sole.
Tide Table App
When rounding headlands, a tide table miscalculation can spell disaster. Get an app like AyeTides ($10; ayetides.com), which shows real-time water levels and tidal trends for 10,000 North American locations–and doesn’t require cell coverage. Always bring a watch and tide chart as backup.
Handheld Marine Radio
Coastal safety depends on up-to-date forecasts. A five-watt VHF transmitter like the Midland Nautico 3 ($80; midlandradio.com) can monitor NOAA Weather Radio, issue distress calls, and alert you to surprise storms, wildfires, or approaching tsunamis.
Pack Liners
Keep dunked gear dry with waterproof protection like Granite Gear’s eVent Sil Ultra-Duty Pack Liners ($44 to $57; granitegear.com) or Sea to Summit’s eVAC Dry Sacks ($18 to $35; seatosummit.com).
ESCAPE RIP CURRENTS
Keep calm, shed your pack, and survive.
>> Spot trouble. Rips are circular currents that create narrow jets of water rushing offshore through the surf, and they can form anywhere waves are breaking, including lakes. Look for a band of churning water, a line of debris washing seaward, or plumes of foam projecting beyond the surf.
>> Don’t struggle. A typical rip moving at one meter per second will quickly exhaust you. Don’t try to swim straight back to shore.
>> Relax and float. Ditch your pack. Then, assuming no other hazards are present (freezing cold, pounding waves), tread water to keep your head afloat. Most rips will return you to shallow water within five minutes.
>> When necessary, swim parallel. In about 10 to 20 percent of cases, a rip will pull you outside the surf zone instead of returning you to shore. In that case, after drifting beyond the breakers, swim parallel to the beach (shown), then make your way toward shore at an angle. You can also swim parallel in the surf zone to escape a rip that’s dragging you toward other hazards. If swimming one direction is a struggle, go the other way.
>> Brave breakers safely. When approaching land, be alert for crashing surf, which can swamp and disorient you. If turbulence knocks you off your feet, prepare to hit bottom; grasp your head, pull your elbows in, and hold that tuck-and-roll position until you can find your footing again. Instead of fighting your way through the surf zone, “let the whitewater push you toward shore,” says Dempsey.