Updated December 3, 2024 06:02PM
How to Build Your Own Workbench
Claim a corner of your garage or basement to create this ultimate setup for storing, maintaining, and repairing gear.
'(Illustrations by Supercorn)'

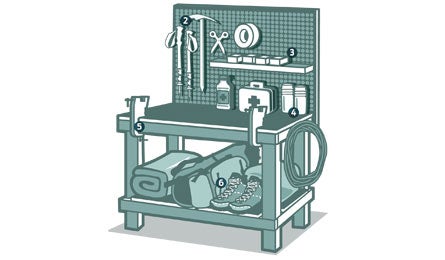
Investment: About two hours and less than 50 bucks. Return: A well-organized “gear center” means you’ll store your stuff smarter, fix it better, and be able to pack for a weekend in a matter of minutes. You’ll need some wall space: about four feet wide by approximately six feet high (the height depends on how much pegboard you want to install). Start with a basic workbench design, with a storage shelf underneath. All parts can be found at home improvement stores. Then install a sheet of standard pegboard and customize your space as needed:
Frame
Use 2x4s and build one side at a time, on the floor; it’ll be easier to square the joints. Assemble with screws, not nails, for better longevity.
Shelves
Use plywood, not particle board, for a more durable surface. Install the bottom shelf first. Want a larger working surface? Cut the top to overhang the frame by six inches.
Pegboard
Secure this to the wall studs, not the workbench. Organize your gear and tools to maximize space.
—Buy a pegboard accessory kit with hooks, shelves, and bins (widely available at hardware stores; they come in a variety of sizes and cost as little as $15).
—Create designated spots to hang ice axes, collapsed trekking poles, first-aid kit, ditty bags, rolls of tape, spools of wire, plus tools like hammers and pliers
—Rig a shelf off of the pegboard and line it with all of your gear treatments: washes, boot and fabric DWRs, and denatured alcohol for cleaning sooty stoves. Use small cardboard boxes for storing webbing, cord scraps, tent stakes, and more. * Put those old BPA-laden water bottles to work storing small items, like spare batteries, first-aid supplies, suncreeen, and lip balm tubes.
—Install a pair of six-inch C-clamps or vice grips one on each end of the bench top) for doing boot resoling or ski-tuning work.
—Use the bottom shelf to store packs, tents, bags, and other bulky items.
—Tape seasonal and trip-specific packing lists and BACKPACKER’s Ultimate Fix-It Guide to the wall for easy reference.