How to Buy and Use Backcountry Skiing Gear

'Go backcountry skiing and experience the mountains' grandeur in a whole new way. Illustrations by Supercorn'
When you slice across a white tapestry of untouched snow that you reached under your own power, you experience the mountains’ grandeur in a new way. They’re both starker and prettier, simultaneously more intimidating and more attainable. It may be the best payoff in winter sports, and it’s available to anyone who knows how to ski and has some avalanche know-how. The face shots are yours for the taking.
Know Thyself
Backcountry skiers are a complex bunch, but we think we’ve got them pinned.
- You’re a resort skier who wants the capacity to go out-of-bounds if opportunity knocks. You need a super-basic frame binding to mount on your favorite skis (something like the Salomon MTN Explore 95).
- Since you ski for the steeps and adrenaline, your backcountry setup will help you slay the sidecountry and a few couloirs. Slap a high-DIN frame binding on some rigid, rockered skis (like the Dynafit Chugach).
- The longer the tour, the better. Backcountry skiing is your means for “hiking” this winter: You need a lightweight tech binding to mount on some lightweight sticks (like the Blizzard Zero G 85).
- Whether it holds fresh powder or mank, 20-degree slopes or 50-degree chutes, the backcountry is your resort. Your setup needs to be both light and strong, so mount a high-DIN tech binding to a burly pair of rockered skis (like the DPS Wailer).
Tour This Way
Loosen buckles for comfort (lock the forefoot down if you start to feel any hot spots). Drag one foot forward, keeping the ski on the snow surface (don’t lift—skis are heavy) like a reverse moonwalk. Repeat.
Time to beast uphill. You’ll learn quickly when a slope is too steep for shooting straight up, but at around 15 degrees you’ll need to start creating switchbacks. There are two ways to change direction on an uphill slope: (1) Facing uphill, shuffle around with baby steps (keeping your weight low and into the slope). (2) Balancing on your uphill pole and downhill ski, lift your uphill ski, swiveling it all the way around so you’re doing ballet’s third position. Shift your balance to your uphill ski and bring the downhill ski around to parallel the other. This is called a kick turn and will win you many style points.
The Lowdown on Skins
From choosing the right ones to taking care of them, this is what you need to know.
(1) Pick a material. There are three types: nylon (best grip), mohair (easiest glide), and mixed. Beginners should stick with nylon.
(2) Cut to fit. Trim the skin so it covers the whole ski base (but not the metal edges).
(3) Put them to use. After removing skins (at the top of a run), “jog in place” to rub any excess stickiness off your bases. Fold the skins glue-to-glue and, if you’re planning on taking multiple laps, stuff them into your shell so your body heat keeps them warm (extreme cold can diminish their stickiness).
(4) Store well. When they’re totally dry, fold them with a “skin saver” or “cheat sheet” (piece of plastic that came in the box with them) to preserve the glue’s stickiness.
A Proper Face-Plant
Lose your balance. It can happen any number of ways, but, for some reason, it’s always called “catching an edge.”
+
Try to scrub speed.
=
Yard sale. The best way to save a skiing fall is to ride out of it. Unfortunately, instincts take over, and, by virtue of trying to brake, you tend to make a bigger mess. Recover: Locate your gear, stomp out a shelf, clear the pow out of your binding, and pretend like nothing happened.
Gear Up
Construction
The main components that affect the ski’s performance are the core and layup. Core Your ski is mostly comprised of wood. Heavier woods (like ash and maple) are better at dampening vibrations, but lighter options (like paulownia and balsa) are better for touring and traveling uphill. Layup Ski makers insert extra materials into or around the core for different benefits. They may add metal for rigidity (think racing skis) or carbon for lightweight rigidity or Kevlar to dampen vibrations.
Profile

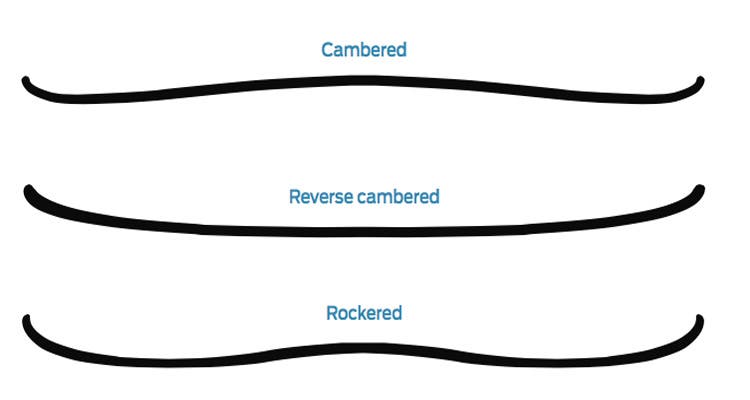
The way a ski handles varying snow is largely determined by its profile shape. A camberedski’s edge will be fully in contact with the snow surface when weighted, giving you maximum power in a turn—making it best for groomed snow. Its opposite, a reverse cambered ski, has the least amount of contact with snow, which makes it easy to pivot, but hard to edge. It’s best for powder. For backcountry skiing, you’ll probably want something in between: A rockeredski is cambered underfoot for powering through turns, but rises in the tip (and sometimes the tail) to get some of the benefits of a reverse cambered ski in mixed and deep snow.
Binding
A frame binding is like an alpine binding, but the foot plate detaches in touring mode. It gives you the security of an alpine binding, but, because it’s heavy (and you need to lift the foot plate with every stride when touring), it can feel cumbersome on long backcountry skins (and loud when your heel smacks the framing). The alternative, a tech binding, locks the boot with two pins in the toe, which makes it lighter (and leaves you with less weight to lift when striding), but can feel less secure when laying into a turn. (Make sure your boot is compatible with your binding.)
Bonus: Talk Like a Skier
More than any other winter discipline, skiing has its own lingo. Print out this page, stow it with your beacon, probe, and shovel, and start spitting salt next time you’re bombing, shredding, ripping, smashing, or getting all-around rad with your brahs.
Types of snow:
Bony (adj): when rocks and other landmines poke through the snow (usually in shoulder seasons)
Bulletproof (adj): when freeze-thaw cycles have rendered a slope so hard that ski edges can’t slice it
Champagne (n): light, feathery, sparkly snow
Corn (n): granular, wet snow that’s pliable and easy to turn in (characteristic of spring or late-season snow)
Death cookies (pl. n): frozen chunks of snow (like avalanche debris) that can throw off your skiing
Freshies (pl. n): new snowfall
Mank (n): wet, grippy snow
Pow (n): the ultimate prize
Everything else:
Bail (v): to hurl yourself majestically to the ground in lieu of actually skiing
Bluebird (adj): when blue skies follow a storm
Face shot (n): the act of beautiful, weightless snow flying up into your face when you turn (cosmic event; rare)
First tracks (pl. n): arcs cut through untouched snow; acquiring them has been known to cause tension among friends
Gaper (n): a (usually new) skier whose ignorance of the mountains and other skiers is noticeable; can be identified by the forehead gap between their helmet and goggles
Steazy (adj): achieved with style and ease
Stomp (v): to cleanly land a jump
Tomahawk (n): a cartwheel-like crash
Not so fast! All winter sports require knowledge of avalanches. Take a class (~$350).