Updated July 8, 2025 12:10PM
Uncle Stevie's Patented Duct Tape Heel Blister Repair
This time- and trail-tested solution to heel blisters has saved our Rocky Mountain Editor's bacon on many an epic. May it do the same for you.
'1. Heel blisters can cause agony step after step, and they often make a surprise appearance at the start of big trips, when your payload is heavier…'
.jpg 28216")
1. Heel blisters can cause agony step after step, and they often make a surprise appearance at the start of big trips, when your payload is heavier than normal. Your first step; Clean and disinfect the area.
.jpg 28217")
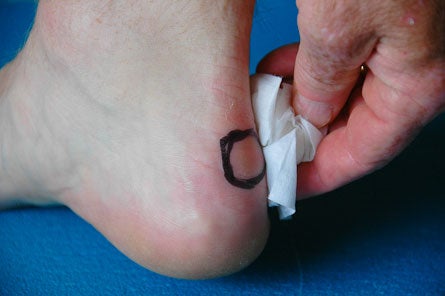
2. To help moleskin, Glacier Gel, and tape stick better, paint any unopened areas on and around the blister with tincture of benzoin, a skin adhesive. (Note: The alcohol solvent hurts on open sores).
.jpg 28218")
3. For open blisters, Glacier Gel from Adventure Medical kits is the ticket. Apply it stretched, with as few wrinkles as possible. Keep your ankle flexed forward during the taping procedure.
.jpg 28220")
4. Hold Moleskin and Glacier Gel in place preferably with slippery duct tape, which allows socks and boots slip over the wound. Blister unopened? Just paint the bubble with Vaseline or antiseptic cream and go to duct tape.
.jpg 28221")
5. Start by tightly stretching a 6- to 8-inch piece of duct horizontally over the blister.
.jpg 28222")
6. Rounding the edges keeps them from rolling into pressure points later on.
.jpg 28223")
7. Stretch several more pieces in the same direction.
.jpg 28224")
8. Once the heel is thoroughly and smoothly covered, put several sections of tape in a ‘stirrup’ fashion under the heel and instep, attaching them to the horizontal bands.
.jpg 28225")
9. Layer tape in both directions until you have a smooth, tight wrap that covers the heel pocket completely. Wrap well forward of your ankle bone, but not far above them.
.jpg 28226")
10. Finish the wraps with one or two sections of tape running down the Achilles and underfoot. This keeps heel lift friction from rolling and peeling the horizontal tape bands.
.jpg 28227")
11. Almost finished, the repair should look like this.
.jpg 28228")
12. Hold the assembly in place by running one or two half-widths of duct tape around your heel and across the forward fold of your ankle. Keep your shin tilted forward during this, to prevent uncomfortable tension while walking.
.jpg 28229")
13. To finish, trim up any uneven edges and awkward folds with scissors. While hiking, you may need to trim back the achilles, shin and forefoot to avoid irritation. Avoid wet-footed river fords, since they’ll loosen the whole blister repair.
.jpg 28230")
14. On multi-day trips, remove the tape overnight to let your foot breathe. To save time and make tape last longer, cut the instep strap and carefully remove the tape booty for re-use. A short piece of tape will reattach it.
ADVERTISEMENT
Photos by Jennifer Howe / howephoto.us
Learn to handle common medical problems with Backpacker Magazine’s Online course on ‘Wilderness First Aid’. Join Today!