Published May 20, 2011 05:54PM
The Manual: Learn How To Paddle Whitewater
Learn how to ride rapids, and you'll open up a new way to explore the outdoors.
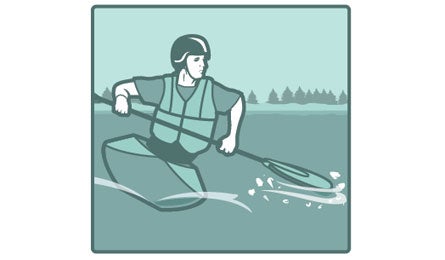
'Master the low brace whitewater kayaking move. (Supercorn)'
Learn how to ride rapids, and you’ll open up a new way to explore the outdoors. And it’s easier than you might think. Master these fundamentals and practice them with experienced friends, a paddling club, or a certified instructor, and you’ll be ready to kick off summer with a wilderness float.
1. GEAR UP
>> Pick your vessel. Canoes easily handle up to class II and provide ample cargo space. Hard-shell kayaks are fast, nimble, and suited for every class, but controlling them takes practice. Though less maneuverable, inflatable kayaks are very stable, making them a good choice for novices (up to class III) and for skilled paddlers (class IV). Rafts are the most stable and spacious but slow to turn.
>> Wear a PFD (personal flotation device) and helmet. Clip a knife to the PFD in case you get entangled in a rope. Also bring a whistle and a throw bag (a rescue line in a stuffsack).
>> Pack essentials like sunblock, food, water, drybags/boxes for destructibles (phone, radio, first-aid kit).Clothing choices depend on your hot-bloodedness, but in general, for water temps less than 68°F, wear a full wetsuit.
2. PLAN YOUR TRIP
Choose a river suitable for the group’s least-skilled paddler:
>> Class I (beginner) Small waves and few obstructions.
>> Class II (novice) Straightforward rapids with wide, clear channels and occasional obstacles.
>> Class III (intermediate) Moderate, irregular waves that can swamp a canoe; may require complex maneuvers in fast or tight passages.
>> Class IV (advanced) Intense, powerful, but predictable rapids and hazards, like submerged trees and rocks, that mandate precise boat handling and a battle-tested Eskimo roll for kayakers.
>> Class V (expert) Extremely long, obstructed, steep, or very violent rapids. Rescue is often difficult even for experts.
>> Class VI (extreme and exploratory rapids) Extremely dangerous, unpredictable, and often considered not navigable.
Next, get a river map showing your entire route, mileages, and key features like rapids, portages, obstacles, and the put-in and take-out points. (Buy them from river-management agencies or boating and outdoor-gear stores.) Before you go, research current water levels, which vary with the season or dam releases, and the recommended safe river levels, both available at americanwhitewater.org.
3. MASTER THE LOW BRACE (See illustration above)
For whitewater, add this stroke to your paddling arsenal. It’s key to staying stable in a rapid, so you don’t get flipped or spun. Employed briefly between strokes, the low brace uses your paddle’s blade as a sort of outrigger. Here are the steps:
1. Sit upright and arch your back. Hold the paddle across your boat and close to your navel, with your elbows lifted directly over your hands (picture a scarecrow’s arms). Rest the backside of a blade (say, the left one) flat on the water. Right elbow might rotate down a bit.
2. Tilt the boat a few degrees to the side (the left) by slightly shifting your weight while pressing the opposite (right) knee against the hull. For extra support, sweep the blade back and forth, flat on the water surface, but don’t lean on it—control tilt with your hips.
4. SCOUT THE HAZARDS
You’re floating along smoothly until you reach a stretch of whitewater. Before plunging in, follow these steps:
>> Pull to shore and suss out any rapids rated at the upper end of your ability or that you won’t be able to see on the approach.
>> Look for hazards that may flip you or pin you underwater, like a downed tree across the river (aka, a strainer) and any boulder with a large wave piling up on its upstream side (signaling a hydraulic that can trap you).
>> Break down the run into individual moves, and ask yourself whether you can pull off all of them in succession.
>> Consider the consequences of getting ejected. Do the rapids flush into a gentle pool, for example, or over a giant waterfall?
>> Learn to recognize and turn into eddies—stretches of calm water usually found along riverbanks, but also sometimes on the downstream side of large boulders. When the current below a boulder “smiles” at you (looking like a ‘U’ to the boater), it usually indicates a safe eddy, but a “frown” signals a dangerous recirculating hydraulic, which can trap you.
5. RUN THE RAPIDS
Follow the “tongue” created by the main channel. From boater’s vantage, it looks like an inverted V and is often obvious in easy-to-moderate rapids; it will push you in the desired direction. When in doubt, paddle hard to move faster than the current, which will help you maintain control.
6. STAY SAFE
>> Practice self-rescue, such as escaping a flipped boat and righting it. Also rehearse group-rescue skills, like using ropes to reach a trapped victim.
>> When swiming, keep near the boat. It makes you visible. But stay upstream of it, lest it slam you.
>> If you get tossed, float on your back— feet up and pointing downstream with legs bent, ready to absorb impact and push off objects. Swim ashore.
>> If you can’t avoid a strainer, crawl-stroke aggressively to it and launch over it.
>> Signal for help with three long whistle blasts.