Published January 6, 2022 09:40PM
How to Plan a Bucket-List Backpacking Trip
Secure permits before they sell out, convince your boss to give you time off work, make a foolproof meal plan, and more.

(Photo: Sierra Lara via Getty Images)
Once-in-a-lifetime backpacking trips are just that: once in a lifetime. So when the opportunity to plan one arises, don’t miss a beat. Use these tips to get organized for a memorable trek.
Snag a Permit Early
Choosing your destination requires more attention to detail than throwing a dart at the map, and if you’re aiming to backpack in a national park, that’s doubly true. Not every area in these parks is popular enough to warrant securing a permit as early as possible, but if you’re planning a life-list trip, chances are you’ll want to work fast to make sure you get the campsites you’re chasing. Walk-up permits are a good backup but never a guarantee; use this guide for some of the most popular national parks to determine how soon you need to start preparing. Dates for established backcountry campsites in these parks may change year to year, so always do some research well ahead of time.
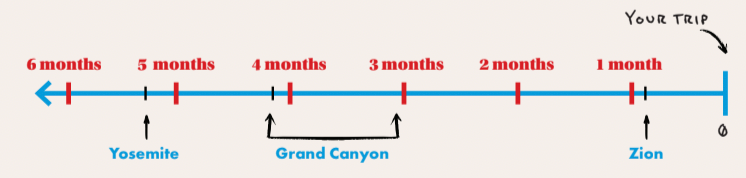
- Yosemite National Park (Including the John Muir Trail southbound): Apply for a lottery at least 168 days (24 weeks) in advance.
- Zion National Park: Backpacking permits open at 10 a.m. MST on the 5th of the month before your trip (i.e. for a trip in April, apply on March 5). Permit systems vary for canyoneering routes.
- Grand Canyon National Park: Snag a permit between the 20th day of the month 5 months before your trip and the 1st day of the month four months before your trip.
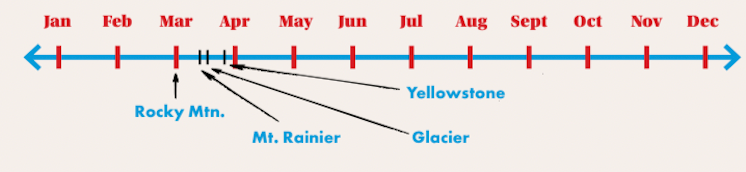
- Rocky Mountain National Park: Reservations begin March 1 at 8 a.m. MST for camping between May 1 and October 31.
- Glacier National Park: Submit applications for a lottery on March 15 for groups of eight or fewer.
- Yellowstone National Park: Submit applications for a lottery between January 1 and March 31.
- Mt. Rainier National Park: Submit applications for a lottery between February 21 and March 7.
Get Specific
Once you’ve decided where to hike and gotten permits, it’s time to figure out your boots-on-the-trail plan. Pull up the Gaia GPS app and get started:
Map your route.
At home, open Gaia on your phone or computer. Do a quick search to track down your trailhead, then use the “Create Route” tool to plot your hike. The route you create will automatically “snap” to the trails already plotted on the Gaia topo maps. Plot your route from start to finish and save it.
ADVERTISEMENT
Choose your campsites.
Look at your total mileage and divide it by the number of days you want to spend hiking. If you’re on your computer, access your route and move your cursor over the elevation plot—an indicator will track on the map in correlation with the elevation profile. Poke around near your divided-mileage points for established campsites (represented by tent icons), flat areas, and water sources. (Tip: Flip to the satellite maps to get a sense of the vegetation).
Mark promising spots with waypoints.
Think about the what-ifs. Even with a plan, backpacking is unpredictable. Build in contingency options: different routes you can take if your goal is impassable, bailouts in case of injury, backup campsites, places to find water, etc. Mark notable spots with labeled waypoints.
Save it for later.
On your phone, select your route, choose “More,” and click “Download Maps.” Pick the resolution and any additional layers you want to have access to in the field. We like Gaia Topo, NatGeo Trails Illustrated, and, if your trip is on national forest land, forest service maps (marked USFS 2016 in the app). Satellite maps can also be handy. Then click “Next” and download the maps for when you’re outside of cell coverage.
ADVERTISEMENT
Menu Management
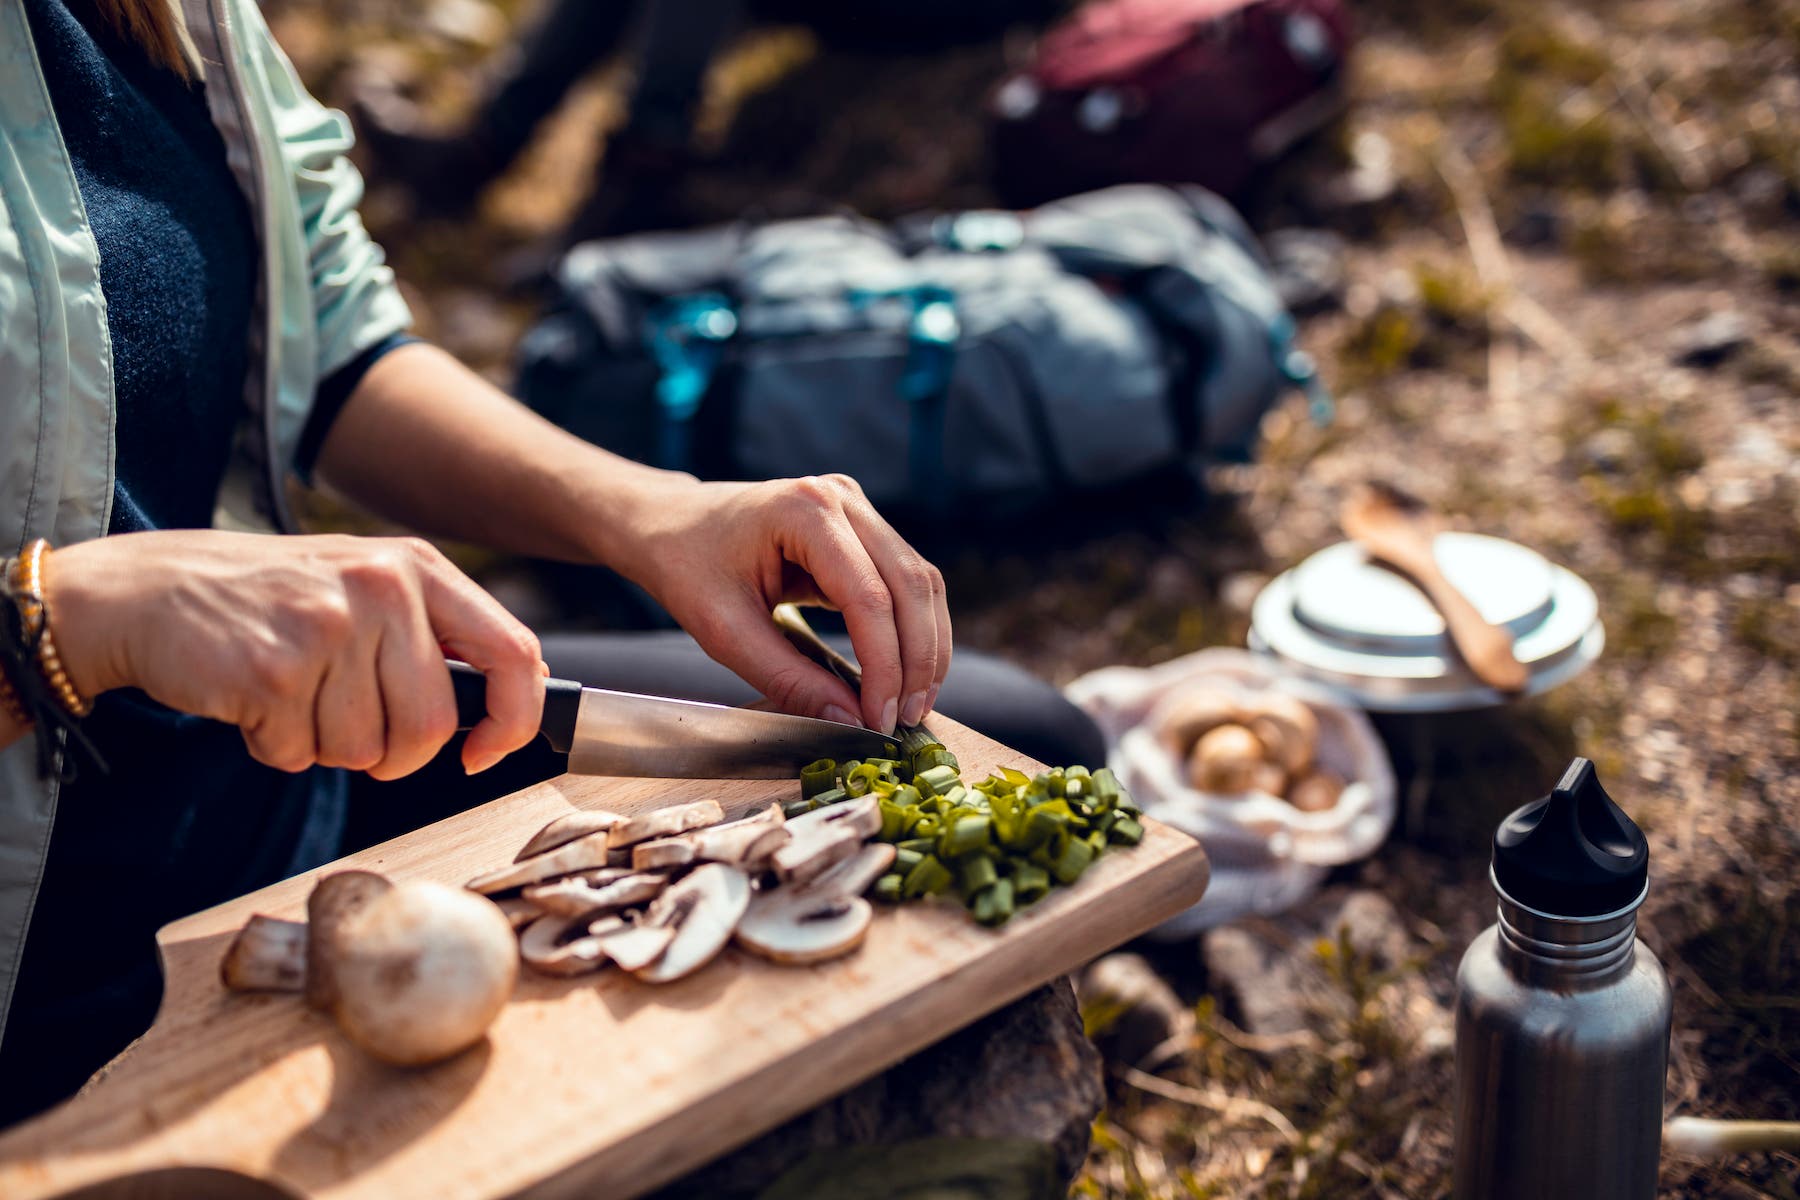
Maybe the most important question before any big trip: What are you going to eat? While the details of setting a menu are limitless, there are two majordirections you can go with your food: dehydrated or the real deal. Here’s how to pick what’s best for you.
Dehydrated
Dehydrated meals are easy: Just boil some water, pour it into the pouch, seal it, and wait. You can even make it without a stove by cold-soaking, if you’re willing to wait. If you’re eating in an area without much clean water, dehydrated meals are the way to go because you won’t have to use more of your water to clean any dishes. They’re also lighter, calorie for calorie, than cooking fresh. The downside: Dehydrated meals are a little pricier than fresh ingredients. You have to decide if the convenience is worth the cost. Not sure what meals to buy? We’re finding the best dehydrated meals in our series “Pouch Wars,” so you don’t have to waste money and tastebuds on rehydrated slop.
Fresh
If you’ve got some chops in the kitchen or you just want to save money, then you should prepare fresh meals at your campsite. If you’re a picky eater, you can cook what you actually want instead of forcing down an unappetizing dehydrated meal. These meals don’t have to be multi-course smorgasbords, you can start with simple meals like burrito bowls or mushroom and pea orzo. The downside to fresh meals: Needing to do dishes after a long day of hiking, setting up camp, and cooking can be pretty inconvenient.
ADVERTISEMENT
How to Get Time Off
Perhaps the most difficult part of planning a big trip is getting enough vacation time for it. For the majority of people, figuring out how to balance backpacking with a career is a roadblock to dream adventures. But it’s not impossible. We surveyed a collection of real people with real jobs (i.e. not professional athletes, travel writers, or digital nomads) to put together some strategies you can use for talking to your boss.
- Tweak your schedule. “I’m a master at rearranging a schedule for a four-day work week, which makes for some great long-weekend adventures.” —Military engineering contractor
- Think ahead. “Start talking to your boss a year in advance. They’re a lot more likely to make accommodations for you when you’re not surprising them.” —Software developer
- Negotiate. “If you’re good at your job, odds are your boss wants to keep you (and keep you happy). Talk to them about what you’re hoping to do. Bosses are people, too, and the good ones get it.” —Occupational therapist
- Foster trust. “If you want to do a month-long trip every year, good luck. For me, it was about framing it as an opportunity that I won’t have again. Ultimately, it was a matter of my boss trusting me, which is something I spent my career building.” —Green energy asset manager
- Cover your bases. “You have to convince them that they’ll barely know you’re gone. Spend a lot of time beforehand making sure all your work is taken care of while you’re away.” —Software salesperson
- Game the system. “Plan your trip around a national holiday so you can use fewer PTO days.“ —Backpacker editor

Get Your Body Ready
Being physically prepared for a trip is just as important as packing all your gear and organizing your food, says personal trainer and 2018 Pacific Crest Trail alumnus Lee Welton. As the owner of Trailside Fitness, Welton trains hikers for big trips. “We’d all rather enjoy the journey than endure it,” he says. Enjoy the views more and “avoid the negative self-talk that comes with being out of shape and not training or preparing for this trip,” as Welton puts it. Training also helps you avoid injuries like shin splints, plantar fasciitis, stress fractures, and knee and ankle overuse injuries.
Use this eight-week training plan from Welton—don’t be afraid to customize it for yourself—to prep your body for a weeklong backpacking trip with moderate elevation gains.
ADVERTISEMENT
WEEKS 1 THROUGH 4
Complete three sets of each of the following circuits three days per week.
Circuit 1
- 15 Goblet squats | Squat with a 20-pound kettlebell or dumbbell held to your upper chest.
- 15 Front step-ups (per leg) | Start with a 4- to 6-inch step; if you have good control through the movement, increase the height, maxing out at 8 to 10 inches.
- 15 Calf raises | Starting with your feet shoulder-width apart, raise onto your tippy toes, then slowly lower.
Circuit 2
- 10 Incline push-ups | Elevate your hands on a bench or chair, then push up as normal.
- 10 Single-arm rows | Lean over a bench with one hand on the top and the other dangling to the side. Pull a dumbbell or other weight into your chest with the hanging arm.
- 10 Bird dogs | Start on all fours and slowly extend your right arm and left leg, staying balanced. Repeat with your left arm and right leg.
Circuit 3
- 15 Glute bridges | Lie on your back with your knees bent and raise your hips to create a straight line from your knees to shoulders. Hold for 20 to 30 seconds.
- 15 Dead bugs | Lie on your back with your arms up and knees above your hips at right angles. Lower your left arm above your head and extend your right leg straight out. Repeat with your right arm and left leg.
- Plank | On your elbows, hold for as long as you can.
ADVERTISEMENT
WEEKS 5 THROUGH 8
Add weekly 6- to 10-mile hikes with at least 1,500 to 2,000 feet of elevation gain to gauge your progress. “If your quads are really sore after the training hike, you might want to spend a little more time doing step-down exercises, for example,” says Welton. Do three sets of each of the following three days per week.
Circuit 1
- 15 Reverse lunges (per leg) | Step backward with one leg, lowering your back knee until the front is bent 90 degrees.
- 15 Lateral step-ups (per leg) | Instead of stepping onto something in front of you, place it to your side.
- 15 Single-leg deadlifts (per leg) | Holding two dumbbells, stand on one leg and lean forward until your lifted leg is parallel to the floor. Return to standing.
Circuit 2
- 10 Inverted rows | Lie beneath an unweighted barbell racked on a Smith machine or squat rack. Gripping it at shoulder-width, pull yourself up to the bar.
- 10 Shoulder taps (per arm) | From a push-up position, touch one hand to the opposite shoulder, then reverse.
- 10 Single-leg glute bridges (per leg) | Just like regular bridges (see left), but with one leg—the other should point skyward.
Circuit 3
- 12 Step-downs (per leg) | Just like step-ups, but reversed.
- 15-foot Heel walk | Walk on your heels, taking small steps.
- Side plank | On your elbow, hold for as long as you can.

ADVERTISEMENT
Can I Bring That?
Packing for a long trip is a game of what stays, what goes, and what TSA is going to make you chuck in the trash can. Camping gear is unique—make sure you pack it the right way and know what to leave at home when traveling by plane. While these are the official guidelines, it’s up to a TSA officer to make the final determination about what makes it through security.
Camp Stoves

Checked: OK | Carry-on: OK
Stoves themselves are fine—just make sure there’s no fuel or vapors coming from them. Leave the lids off of empty fuel bottles. And leave the fuel at home—you’ll have to purchase more canister or liquid fuel at your destination.
Pocket Knife

Checked: OK | Carry-on: NO
Generally, you’re not permitted to travel with anything sharp on your person, for obvious reasons.
ADVERTISEMENT
Food

Checked: OK | Carry-on: MAYBE
For the most part, food is fine to carry with you, especially in sealed packages. Expect some questions if you have jerky or nuts running loose in your bag (and keep in mind, customs may take issue with food if you are traveling internationally). Gels or liquids need to be less than 3.4 ounces and fi t into the same 1-quart resealable bag that your toothpaste and other liquids fit in.
Trekking Poles
Checked: OK | Carry-on: NO
Pointy enough to be a threat, apparently.
Tent Poles and Stakes
Checked: OK | Carry-on: NO
These are too sharp for your carry-on, but they’ll be fine in checked luggage. Cover them up so no one gets poked when they’re inspecting your bag.
ADVERTISEMENT
Lighters and Matches

Checked: MAYBE | Carry-on: OK
The TSA prefers you carry disposable and Zippo lighters with fuel on your person—you can leave them in your checked bag, but only if they’re emptied of fuel or in a DOT-approved case. You’re allowed one book of safety (non-strike anywhere) matches in your carry-on.
Rocks or Sand
Checked: OK | Carry-on: OK
When traveling domestically, the FAA specifically says this is OK, and we didn’t even have to ask.
Bug Spray
Checked: OK | Carry-on: MAYBE
No aerosols in the cabin, but they’re OK in your checked bag as long as they’re not labeled as hazardous. Non-aerosols under 3.4 ounces and packed with the rest of your liquids are OK.
ADVERTISEMENT
Bear Spray

Checked: NO | Carry-on: NO
Never, ever. Buy some at your destination and find a local used gear shop to consign it to after your trip.
Crampons
Checked: OK | Carry-on: MAYBE
Technically you can take these in your carry-on, but we can’t say definitively that they won’t be taken away.
OK, now you’ve got everything into a bag. Aside from making sure your checked luggage meets the weight and size requirements of your airline, make sure there’s nothing that could cause your belongings to stand you up at baggage claim:
- Depending on the size and shape of your backpack, you might have an easier time packing everything (including your pack) into a duffel for the plane.
- If you do pack everything into your backpack, eliminate any dangling straps or buckles that could get caught on something in transit. Consider using a sack or even a big trash bag (similar to what airlines might give you) to keep everything contained. Tighten down shoulder and hip straps as much as possible.
- Make sure your bag ticket is tied to something solid and can’t slide or pull off. Otherwise it’s going to be a while before you see that pack again.
- Stow everything inside your backpack, including gear you might normally hike with outside your pack (like a foam sleeping pad, water bottles, etc.).