Updated July 10, 2025 09:19AM
Night Sky Photography - How to Get the Best Photos
Capture beautiful nightscapes without investing in a new camera with these expert tips on how to photograph starry skies, meteor showers, the Milky Way, and beyond.
'Dan Eckert'
Beautiful night sky photography is all about technique. The secret to producing immaculate nightscapes isn’t in a wide-angle lens, a high-end telescope, or a new Nikon or Canon DSLR camera—nor is it in post-processing or photo-editing software. These tools may help, but without technique, composition, and the knowledge to use your camera effectively, you won’t get anywhere. Whether you’re a beginner, intermediate, or advanced photographer, it’s important to focus on the fundamentals of good astrophotography. With these tips from the field, you’ll be ready to tackle your bucket-list dreams and shoot for big things—think auroras, eclipses, the deep sky. The possibilities are limitless.
The Essential Night Sky Photography Tool Kit
- Decent low-light camera (shoots in manual, raw, and bulb mode)
- LED headlamp with red or green settings
- Spare batteries
- Tripod
- Remote or external shutter release
- Lens hood for light interference
- Intervalometer (optional)
- Camera filters (optional)

How to Photograph Stars: Tips for Beginner Photographers
1. Choose a Subject
Once you’ve chosen which star or constellation you want to photograph, research moon phases and constellations with apps such as Star Walk (for iPhone) or the free Google Sky Map (for Android) which show you the sky view from specific places at any time of the night. A full moon is the most popular of the eight moon phases to photograph, but you may want to shoot under a new moon to capture constellations in great detail.
There are advantages and disadvantages to photographing under each moon phase. Regardless, check the weather and air quality for systems and events that would otherwise obscure your objectives and your subject.
2. Which Moon or Lunar Phase Is Best for Night Sky Photography?
- New Moon: If you want to photograph the Milky Way or capture fainter stars and starscapes, shoot under a new moon. Downside: the low light increases the noise or aberrant pixels that may occur with common nightscape settings, such as high ISO and a long exposure. Photographing under a new moon as opposed to the bright light of a full moon allows for the dark silhouettes of geologic features to pop out against a starry sky.
- Full Moon: Shooting under a full moon that is low in the sky serves to illuminate the foreground of your scene and drowns out potential light pollution, but this technique isn’t always ideal for celestial photography because it will obscure faint stars.
- Quarter or Crescent Moon: Want the best of both worlds—a detailed foreground and starry skies? Consider shooting with a crescent moon or quarter moon behind you to illuminate the foreground of your scene. If west-facing, shoot in early night (when the moon is low in the eastern sky). If east-facing, shoot in early morning (when the moon is low in the western sky). Contrary to popular belief, a quarter moon is not half as bright as a full moon; it’s closer to 9%.
3. Select a Location
For the darkest skies, go 60 to 100 miles from the city lights and get to high elevations. Notice the effect the high altitude and thinner atmosphere have on light refraction: Shooting through fewer light-dispersing particles creates crisper, brighter shots, with greater transparency and contrast. Also, to capture the most stars in your night sky photography, research which dark sky areas are near you.
ADVERTISEMENT
4. Set Up Your Tripod
As with any night photography, you’ll want to use a tripod. To master it, take a tip from one of the most renowned landscape photographers of all time, Ansel Adams. Adams urged for a methodical use of the tripod. Here’s how:
- Point one leg of the tripod at your subject so you can stand in between the other two legs.
- The central post of the tripod should be vertical and perpendicular; confirm this alignment with a bubble level.
- Acquire an L-bracket instead of a standard mounting plate to keep your camera’s weight evenly centered over the tripod.
5. Frame Your Scene or Subject
Frame one-third of the horizon against two-thirds of the night sky, and verify this a second time in your camera’s live view. This composition technique is called “the rule of thirds.”
What Is “The Rule of Thirds” in Photography?
Rules are meant to be broken, but “the rule of thirds” is the most essential rule of thumb for composition in both general and night sky photography. This technique helps to balance and unify an image. Simply divide your view into thirds horizontally and vertically so that you have nine equal sections of the image. Once you’ve established this imaginary grid in your viewfinder, frame points of interest at the intersections (rock features, faraway city scapes). Research shows that people’s eyes most naturally gravitate towards these points of intersection in an image, so use them to your advantage.

ADVERTISEMENT
6. Preserve Your Night Vision
Allow your eyes to adjust to the darkness by turning off standard lights for 45 minutes. Need to illuminate the trail or camera controls? Cover one eye when the light is on—the protected eye will stay dark-adapted. If you need a headlamp, use one like Petzl’s Tikka; its red LED won’t affect your night vision.
Why Is It Better to Use Red Light for Night Vision?
The eye is composed of photoreceptors called rods and cones that convert light into electrical signals for your brain to interpret. Rods are responsible for low-light vision and are more numerous than cones; they contain the biologic pigment rhodopsin. When rhodopsin is exposed to bright light, it becomes photobleached. It may take up to 30 minutes to completely regain your night vision. Red light (utilized in many headlamp models) has a longer wavelength and is less disrupting to your vision than light on the other end of the spectrum.
Want to master the basics of shooting in the backcountry? Sign up for our Outdoor Photo School course through AIM Adventure U today.
Common Mistakes to Avoid in Night Sky Photography
| Level | Common Mistake | Quick Fix |
| Beginner | Leaving the camera’s autofocus setting on, which delivers out-of-focus star shots. | Set the camera to manual and adjust the focal length to infinity. Verify that far-off stars are in focus by snapping a test shot, then review the shot by zooming in to the sky’s brightest star on the LCD display. If it appears out of focus, adjust accordingly. |
| Intermediate | Judging a shot’s exposure by looking at the LCD screen. | Confirm correct exposure by using the histogram – a graph that shows an image’s range of light. If the graph is shaped like a mountain or range, your image is exposed correctly. If the mountain shape has cliff-like edges at the ends of the graph, continue adjusting the settings. |
| Expert | Using automatic noise reduction for every shot. While it improves image quality, it also doubles each picture’s shooting time and burns through battery life. | Disable noise reduction (in your camera’s settings menu) for test images. Reset it for your last exposure. Not planning to print your shot? For digital, you can clean up low-resolution displays and graininess at home using noise filters in basic editing software. |
How to Photograph Stars: Techniques for Intermediate Photographers
1. Situate and Orient Yourself
Point your tripod-mounted camera away from artificial light sources like distant cities or roads. Again, shoot 60 to 100 miles away from major cities and light pollution, and opt for high elevation.
ADVERTISEMENT
2. Adjust Your Camera Settings to Capture Extra Light
Open the aperture wide (low f-stop numbers represent larger apertures), and select the highest ISO (1600 or above). Use a shutter speed that allows your camera to catch excess light (30 seconds).
3. Shoot Several Overexposed Pictures
Many areas may appear white, but quality doesn’t matter—it’s composition that counts. Examine these shots for desirable elements (like rocks or trees) or for distractions (like an angled horizon, bright spots caused by light pollution, or clouds). Note the focus of the stars and foreground objects.
4. Adjust for Composition and Refocus
Turn and pan the camera to frame your desired scene; tilt it to level the horizon and refocus if necessary. Ensure that your tripod is stable and positioned correctly.
ADVERTISEMENT
5. Fine-Tune Your Camera Settings
Overexpose your test shots, adjust for composition, and refocus several times until you’ve framed your desired scene. Then, based on conditions and content (see camera setting reference charts below), adjust ISO, aperture, and shutter speed to expose your subject properly.
6. Shoot RAW Images
Plan to print? RAW files are like negatives and allow for more editing flexibility.
Tip: Save camera storage space by shooting in RAW, but delete test shots.

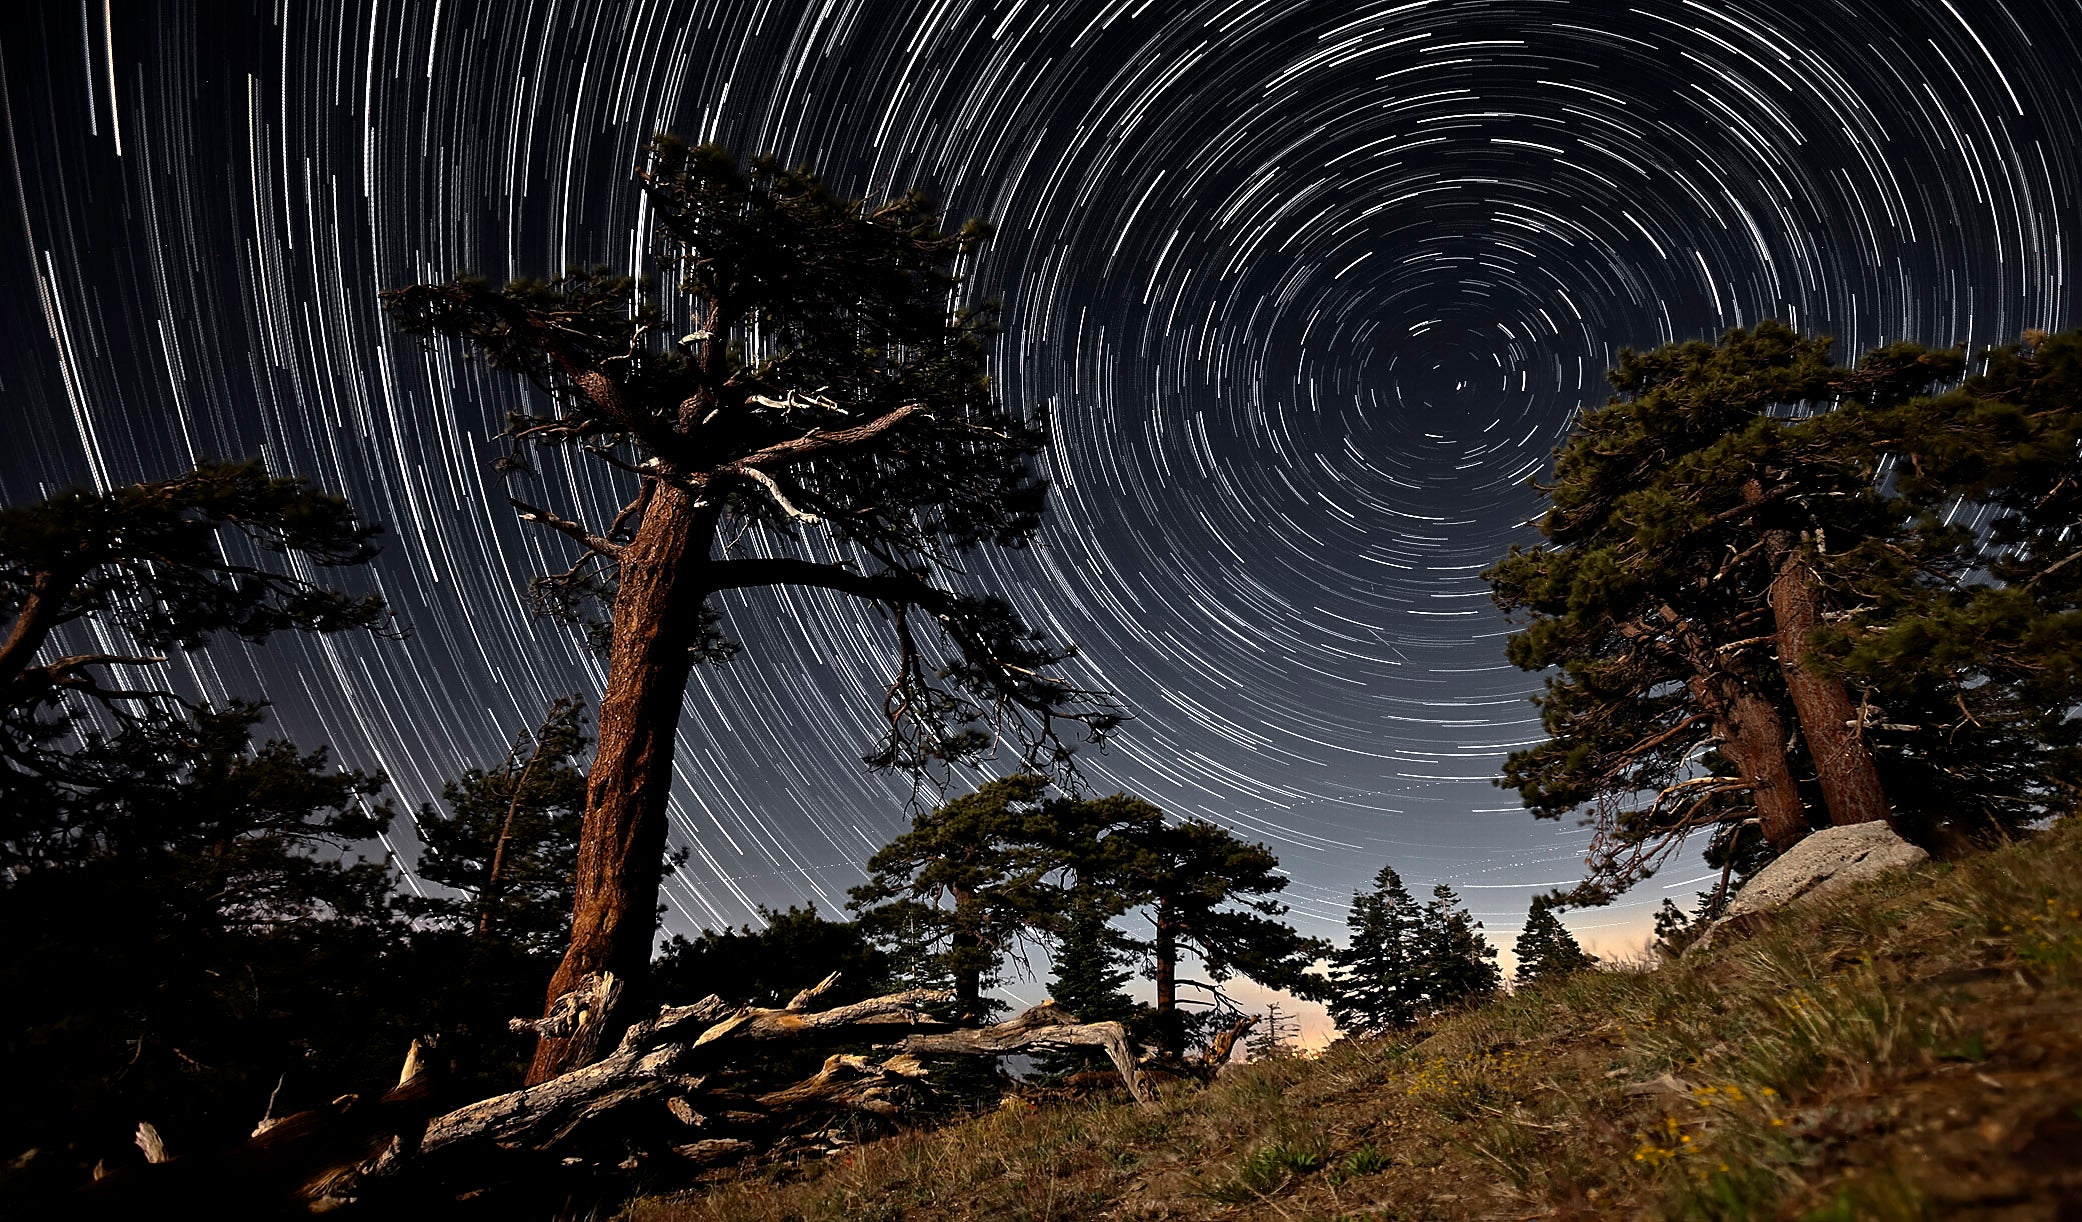
How to Photograph Star Trails
| Camera Settings | |
| Exposure Time | 32 m |
| Aperture (f-stop) | f/16 |
| Sensor Speed (ISO) | 400 |
Key Adjustments: Experiment with exposure times lasting from several minutes to several hours. Longer times will show longer star trails.
- To capture arcs of light, shoot long exposures on clear nights (clouds obscure the stars).
- For vortex-like circles, center your frame on the North Star.

ADVERTISEMENT
How to Photograph Stars in the Night Sky
| Camera Settings | |
| Exposure Time | 8s+ |
| Aperture (f-stop) | f/2.8 |
| Sensor Speed (ISO) | 1600+ |
Key Adjustments: Use a high ISO (higher than 1600 if possible) so that the camera sensor registers low-light despite exposure times short enough to freeze stars.
- Aiming at the Milky Way? It’s brightest in the southern sky; go south of cities and orient south.
- For the Northern Lights, go north of cities and point north.
How to Photograph the Moon
| Camera Settings | |
| Exposure Time | 1/250s |
| Aperture (f-stop) | f/11 |
| Sensor Speed (ISO) | 100 |
Key Adjustments: The moon is bright (and tracks quickly across the sky), so use a fast shutter speed to capture its surface details without overexposing them. Zoom in with your longest lens and focus on the moon’s features. Crop shots with photo-editing software at home (to enlarge the moon’s relative size).
How to Photograph a Moonlit Landscape
| Camera Settings | |
| Exposure Time | 2m |
| Aperture (f-stop) | f/16 |
| Sensor Speed (ISO) | 1600 |
Key Adjustments: Use a small f-stop to give your image greater depth of field so you can focus both near and far elements at the same time. A quarter moon can cast enough light to brighten a scene.
- On cloudy nights, expect shadowless images.
- On clear nights, shadows may be harsh.

ADVERTISEMENT
How to Photograph Stars: Techniques for Advanced Photographers
Layer Images for Otherworldly Effects
Create a scene that merges your favorite nighttime shots into one. Take an underexposed base image of your scene, then add light or change exposure settings in subsequent shots to accentuate different features—foreground objects, the stars, or alpenglow on the landscape.
In Photoshop or other photo-editing software, overlay your darker base image with the highlighted ones, and utilize your layers panel for layer masks to obscure or reveal elements you want to include in the final image. Layer short-exposure star shots to create star tracks with free layering software like StarStax.
Capture Sharp Pictures of Moving Targets
The Earth’s rotation can blur the moon and stars during long exposures. Adjust your ISO (higher) and f-stop (larger) to minimize exposure time, thus eliminating motion-caused blur. Determine max exposure time with this equation: 400 divided by the focal length. The result is your exposure time limit in seconds.
Maximum exposure time limit (seconds) = 400 ÷ focal length

ADVERTISEMENT
How to Paint With Light in Night Photography
You don’t just have to pull out your camera for night sky photography. Experiment with headlamps and other lights to show foreground detail to take more dynamic shots and to simply have fun. To paint with light, you’ll leave your shutter open and use a light source to draw pictures across the scene as if you had an imaginary whiteboard. Play around with several of these advanced techniques for added creative dimension:
- Illuminate Objects: During a long exposure, flash or sweep your headlamp over trees, people, or rock formations. You’ll brighten them in the final photo, while still exposing for and capturing the sky. You can also shine a headlamp in a tent (turn it on for several seconds during the shot) to give it a glowing appearance.
- Write With Light: Point your light directly at the camera while the shutter is open and “write” with it across your frame. Experiment with a long exposure time and low ISO, like 100.
- Spell Words: Letters will record as mirror images; scribble them backward so they’re legible in the finished photograph.
- Change Your Lighting: Take advantage of the different light temperatures, intensities, and beam sizes cast by multicolored LEDs, fluorescent and incandescent bulbs, and candles. Use separate light sources to paint different areas of the same scene. For example, in one photo use a headlamp to illuminate a tent, a lantern to light up a person, and a compact LED to write words.
Ben Canales is a Portland, OR-based photographer. See his night sky photography here.