Published June 20, 2014 10:15PM
Photo School: Mountain Reflection
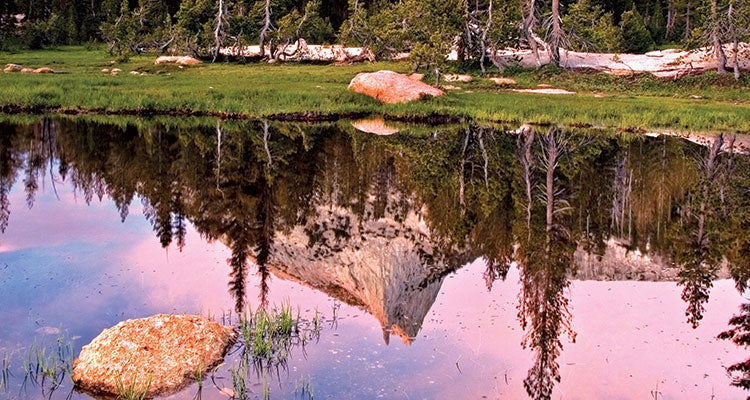
What’s better than a perfect alpine sunset? Seeing it doubled. Here’s how to nab the shot.
'Photo by Tomas Kaspar'

Stalk your target
The best reflections are of well-lit mountains in calm, shadowed water. This happens most often at dawn or dusk, and not just in big lakes; small tarns can be even more still. Walk around and vary the camera’s height to try out different perspectives: In a perfect composition, the reflection extends as far across the water as possible (easiest with a small pool), the tip of the peak is unobstructed, and foreground details help make clear which way is up. Set up a tripod to keep the shot framed as the light evolves and to steady long exposures; if there’s any movement in the water, lengthen your shutter speed to smooth ripples.
Balance the Light
Make sure the mountaintop and sky aren’t overexposed. Best: Use a graduated neutral density filter (below). Workable: Settle for exposing the sky properly; you can fix dark areas later.
Stay Awhile
Don’t pack up too soon: The clouds often light up when the sun is just below the horizon. Plan to arrive early (sunrise) or stay late (sunset) and snap away, or use your camera’s interval settings to capture pics every 30 to 60 seconds. Choose the best ones at home later.
ADVERTISEMENT
Get the Gear
Graduated Neutral Density Filter Forget fancy post-processing: The best way to capture a high-contrast scene is with this old-school tool, a gray filter that fades to clear, acting as sunglasses for part of your lens. Place it so the filter’s darker half blocks the scene’s brightest part. A two-stop filter blocks approximately three-quarters of the light, which is enough to balance out most scenes. In the mountains, a soft transition from gray to clear is the best choice. Buy the size that fits your lens; goods ones start at around $30.