Published June 10, 2015 08:17PM
Photo School: Capture Beautiful Waterfalls
Learn to produce cascade shots that do justice to the real thing.
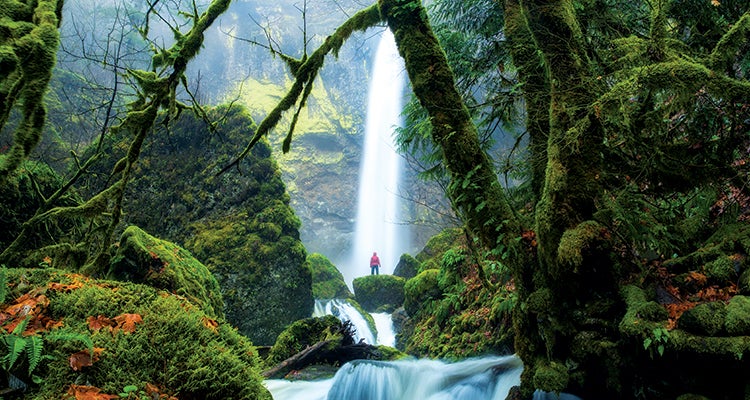
'photo: Michael Matti / Spot: Elowah Falls, Columbia River Gorge, OR Specs: F/16, 1/2 sec, ISO 200. Tools: Tripod, Polarizing Filter'
Watch the Weather
If possible, wait for a cloudy day, which simplifies your exposure by providing even light, especially from midmorning through midafternoon. On sunny days, pick a time when the waterfall is in shadow.
Frame Carefully
Position your camera close to the stream so that the water leads your eye up to the falls. Use the environment to create a natural frame around the cascade, but avoid including too much sky, which tends to be brighter than the rest of the scene.
Experiment With Shutter Speed
The feel of the water will vary as you change the exposure length. To emphasize the main cascade’s power, get close and use a fast shutter speed (1/500 or shorter) to freeze every droplet and splash. For more distant photos, a longer shutter speed (1/4 second or more) will capture silky water. You’ll need a tripod (see below).
Dress Your Models
Make sure the people in your shots are wearing contrasting colors, so they show up well.
ADVERTISEMENT
Gear Up: Tripod
Don’t try to handhold any shot with a shutter speed slower than about 1/60 second. For silky water effects, you’ll definitely need a tripod to keep your camera still. Our pick for entry-level photographers: The Joby GorillaPod series, which offers small, packable options for everything from smartphones to large DSLRs ($20 to $100; 2.2 oz to 1 lb. 3 oz; joby.com) They’re only about a foot tall (max), but you can wrap the flexible legs around trees, rocks, or your pack. With any tripod, look for a ball head to make adjustments easier, and make sure it’s stable before stepping away or letting go of your camera. Pro tip: Use a self-timer or cable release to avoid jostling the camera as you push the shutter button.