Published July 19, 2021 11:05AM
Sprained Ankles: Everything Backpackers Should Know About One of the Trail's Most Common Injuries.
How to keep hiking when your ankle takes a turn for the worse. Plus, keeping them strong and trail-ready.

(Photo: Esther Max)
Here’s one you can probably relate to: The sun’s about to set and you’re scrambling for the best seat to catch the show. Exhilarated by the impending beauty, you run, you leap, you crash. Tweak goes the ankle. As the sky fills with hues of pink and orange, your ankle turns shades of blue and purple. The pain is so bad you can barely limp back to camp.
Or maybe you’re crossing a stream and slip on a rock, or encounter a big root across the trail, or aren’t paying attention on a downhill switchback-there are so many ways to harm the joint that connects foot to leg that ankle sprains account for almost 53 percent of injury-related evacuations from National Outdoor Leadership School (NOLS) courses.
The good news is that most sprains can be managed in the field. Even better is the fact that for the ankle-aware, such painful calamities are largely preventable.
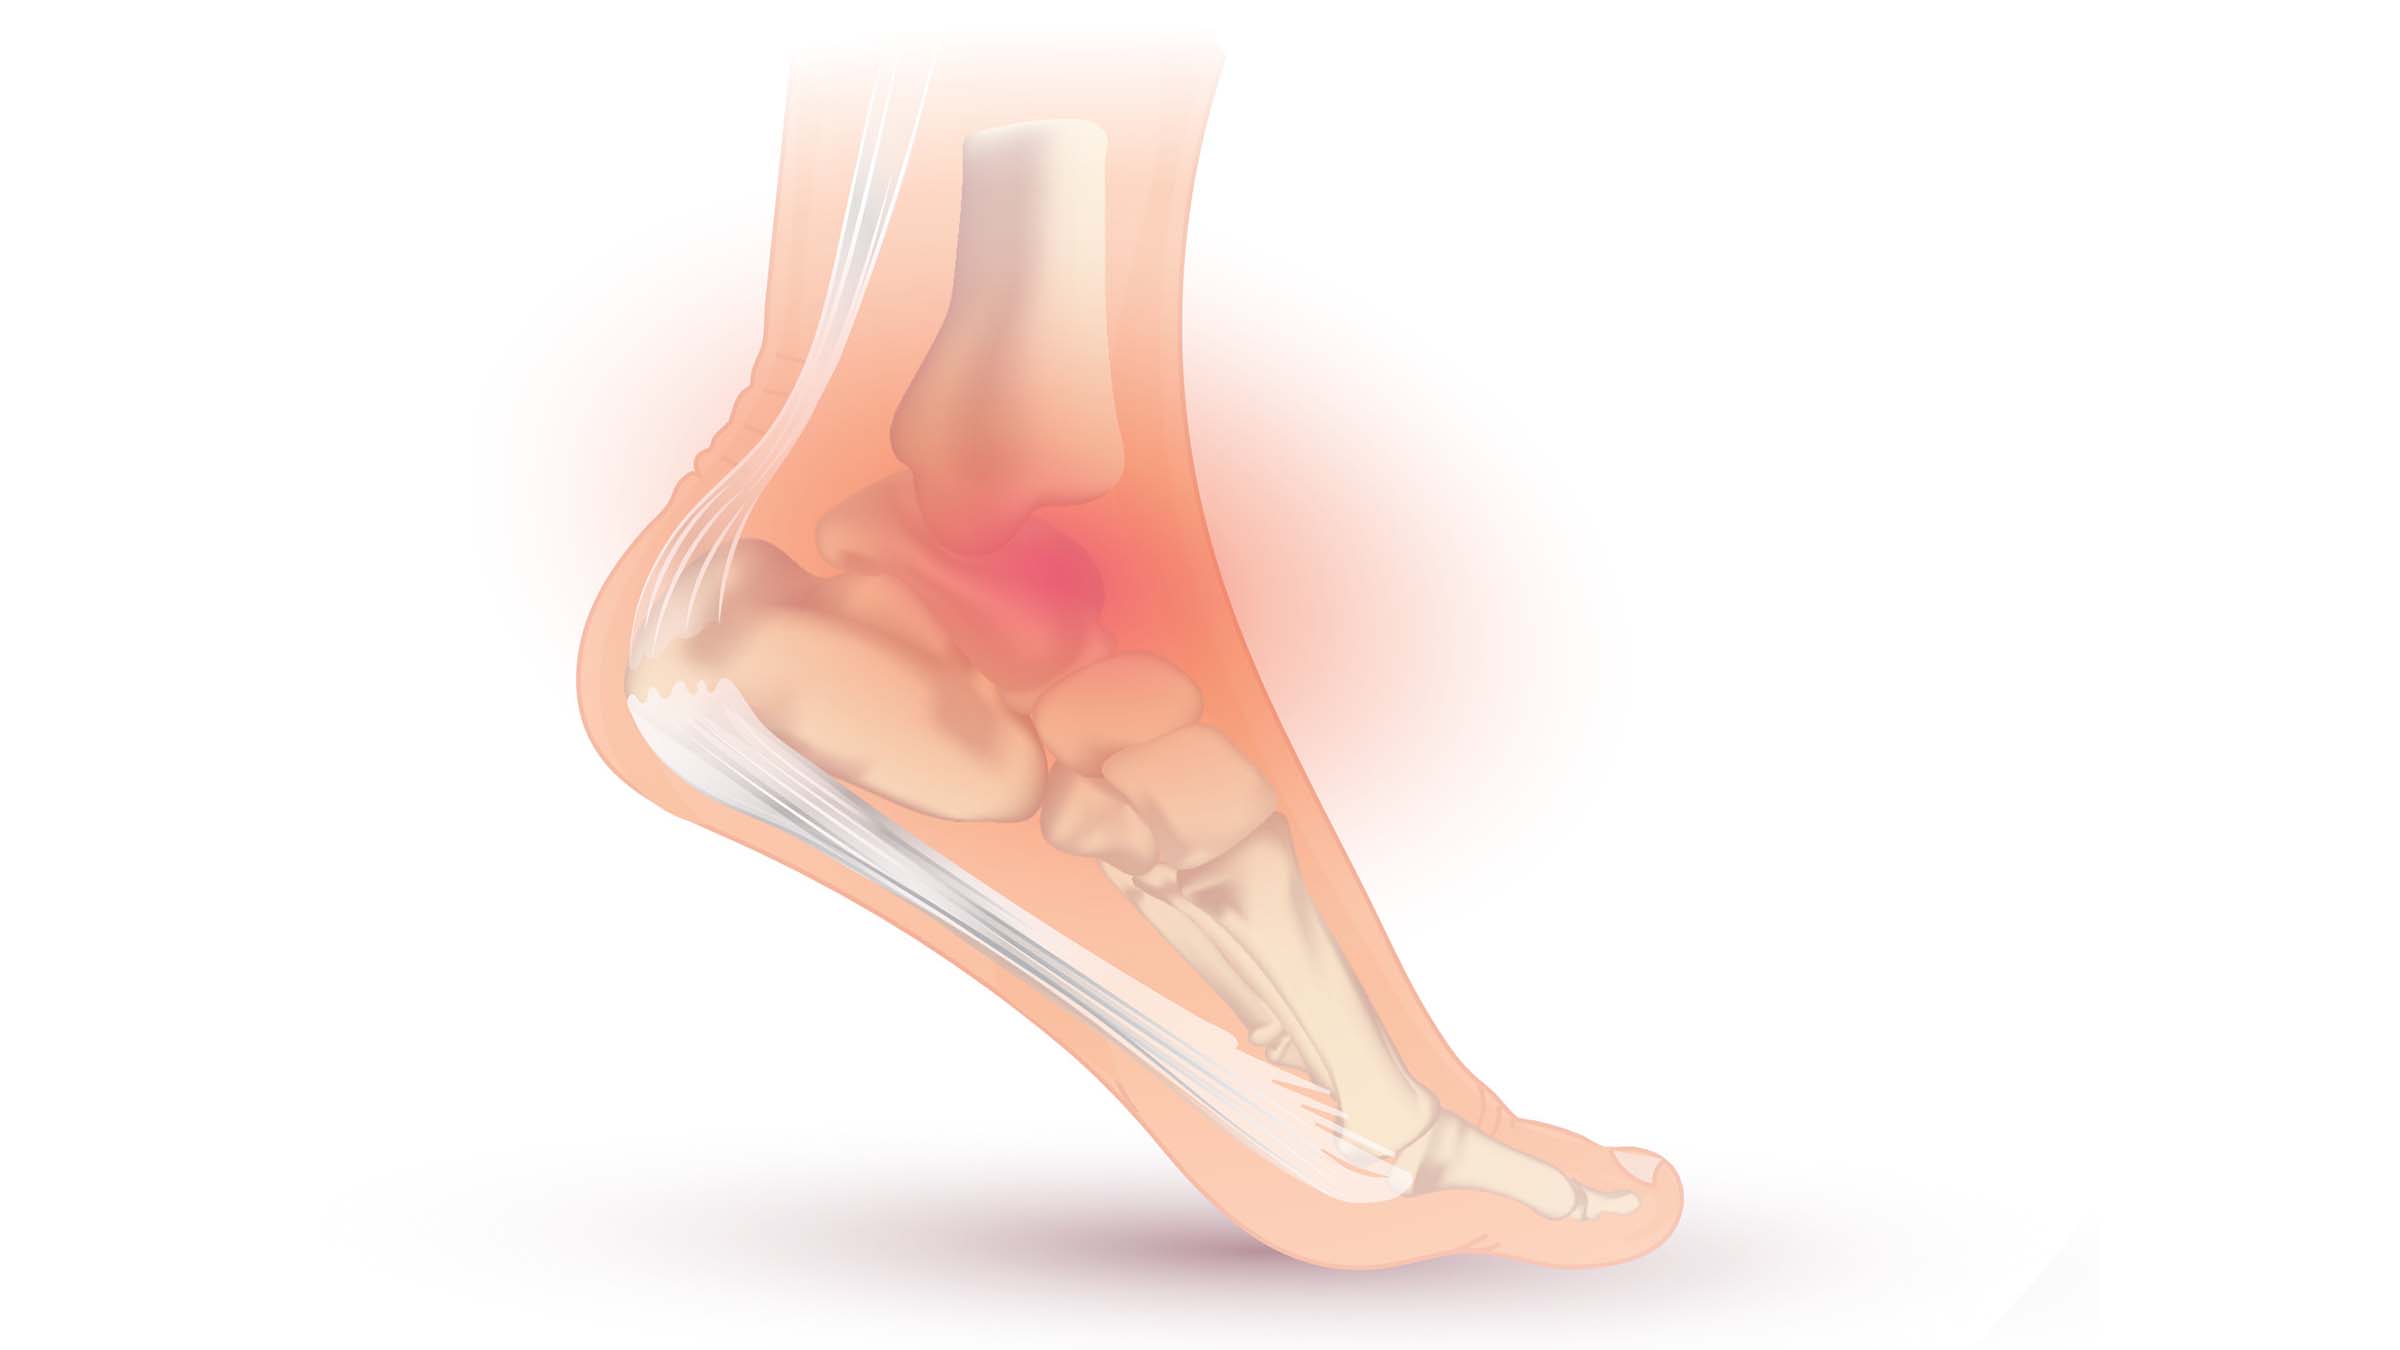
Anatomy of an Ankle Sprain

The two big bones in your lower leg, the tibia and fibula, meet your ankle at the talus bone, which sits atop the calcaneus, or heel bone. A complex arrangement of ligaments holds it all together, and under normal conditions the ankle can withstand some eversion (turning outward) and inversion (turning inward). When an ankle goes too far one way or the other, a sprain results. In severe cases-during a leap, or when plunging downhill under a load, for instance-the tib and fib can be forced apart and ligaments are torn, which causes excruciating pain.
ADVERTISEMENT
Whether you’re the injured one or you’re trying to help someone else with a bum ankle, assessing severity is relatively simple. Which way did the ankle twist? Was there force involved? Was there a “popping” or “snapping” sound? Has the ankle been injured before?
Now study the ankle. Is there swelling or discoloration? How much? Is there pain when you press on the ligaments, tendons, bones? Tenderness means injury. Carefully move the ankle through its range of motion. Again, is there pain?
As with most traumatic injuries, ankle sprains have three levels:
- A first-degree injury, the most common type, occurs when ligaments stretch but don’t actually tear. Moving your foot and the damaged ligaments causes pain, but there’s little swelling, bruising, or instability. With proper care and taping you can keep hiking and will be back to normal in one to two weeks.
- With a second-degree injury, partially torn ligaments quickly swell and cause bruising. The pain may discourage you from moving your foot, and complete healing can take as long as six weeks. A moderately injured ankle can also be taped, but only so the person can limp back to the trailhead, with most of the weight from his backpack distributed among other group members. Walking will be difficult but tolerable.
- Third-degree injuries involve complete ligament tears. Bruising may be extreme and within 30 minutes of the injury you won’t be able to move your foot because of the intense pain and swelling. An ankle that’s injured this severely can be confused easily with one that’s broken (symptoms can include a “pop” or “snap” when the injury occurred, persistent intense pain, tenderness when touched, and an obvious deformity). Whether it’s a third-degree sprain or a break, the injury requires splinting and immediate medical attention. Third-degree sprains can take six months or longer to completely heal, and 10 to 15 percent of those afflicted may require rehabilitative surgery.
To reduce pain and swelling, all ankle injuries should initially be managed with RICE:
REST the injury; in other words, make the person get off his feet.
ICE the ankle; cool it with packed snow, soak it in a cold mountain stream, or wrap it in a wet T-shirt.
COMPRESS the injury with an elastic wrap (if available) to reduce swelling, working from the toes toward the heart. Never wrap so tightly that circulation is impaired and the injured person loses feeling in the toes.
ELEVATE; prop the leg up higher than the person’s heart.
Maintain RICE for 20 to 30 minutes, then allow the injured ankle to rewarm for 12 to 15 minutes before letting the person try to use it. RICE may be repeated every 2 to 4 hours for the first 24 hours. Over the next 48 hours you’ll want to maintain compression and apply ice three to four times a day. Doctors typically recommend an anti-inflammatory/pain-killing drug, such as ibuprofen, for sprains and tendonitis.
ADVERTISEMENT
To help speed recovery most physicians now recommend that patients use a sprained ankle as soon as possible, depending on the severity of the injury. It may be a day or two, however, before the person is willing to walk very far, and of course, the injured person is the one who should ultimately determine if an ankle is usable.
If you prefer the preventative approach, there are several things you can do to forestall an ankle injury:
- Strengthen muscles: The best way to prevent injury is to get in shape by running, cycling, and swimming-preferably with fins-to help strengthen ankles.
- Lose weight: Excess pounds put stress on your ankles.
- Wear good boots: Choose stiff footwear that provides adequate ankle support, and replace soft, worn-out boots.
- Warm up muscles: Before shouldering a pack, put your hands on a tree and lean against it with one leg forward, one leg back. Lock the back knee, and flex the front knee. Press forward until you feel a stretch in the calf muscle (it attaches to the Achilles tendon) of your back leg. Now keep both heels on the ground and bend both knees until you feel more stretching in the lower leg muscles. Hold for 15 to 30 seconds. Repeat with your other leg back. Walk around packless to warm up all leg muscles.
- Learn from the past: If you’ve suffered a prior ankle injury, follow the first four suggestions even more aggressively.
- Don’t be careless: Avoid becoming rushed, don’t hike after dark, and always watch where you place your feet when hiking.
Watch Out for Tendinitis
When your feet and ankles move, so do the lower leg muscles and tendons, which are the fibrous tissues connecting muscle to bone. If you’re not in the best shape and try to hike too far too soon, inflammation of tendons can result. Tendonitis can range from discomfort to debilitation, depending on the degree of inflammation.
ADVERTISEMENT
Achilles tendonitis can occur after a long hike, especially when significant elevation gain is involved, because the lower the heel is in relation to the toes, the greater the stress on the Achilles. Your boots can also be the cause. An inward fold above the heel counter can irritate the Achilles enough to cause tendonitis after just one day of backpacking. Broken down or poor-quality boots that allow too much motion and not enough support may lead to pain and inflammation. Similarly, footwear that’s too stiff or too tightly laced can result in tendonitis at the front of the ankle.
Treatment includes placing a quarter-inch-thick pad under your heel to relieve stress on the Achilles. A strip of padding-small pieces of a closed-cell foam sleeping pad or folded gauze will do-taped on each side of the Achilles will further reduce stress. As a general rule, placing padding on both sides of any injured tendon will reduce stress and discomfort.
This story was first published in Backpacker in 1998, and was last reviewed for accuracy and updated in 2021.