Navigate Like a Pro

Interested in improving your navigation skills? Join Outside LEARN’s Backcountry Navigation course today.
Liz Thomas has backpacked more than 15,000 miles, and she holds the women’s unsupported speed record on the Appalachian Trail (80 days). Here’s how she stays on track.
1. Keep your mind and body sharp
It’s really hard to navigate if you’re hungry, thirsty, or cold. “An unfueled brain is more likely to make poor decisions,” Thomas says.
2. Confirm your location on your map often.
Sounds obvious, but this is the single best way to prevent wandering off course. “I hike with a map in my hand, pocket, or—a little embarrassingly— stuffed in my bra,” Thomas says.
3. Learn to read contour lines.
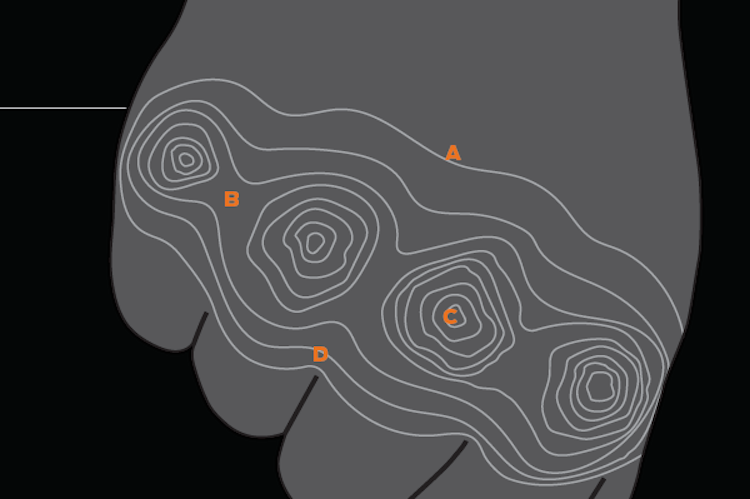
GPS units are great, but you still need to be able to read a map. That means understanding how contour lines represent real-word terrain. Get started: Make a fist into “Knuckle Mountains.” Draw a circle around each peak, or knuckle, keeping your pen at the same “elevation” as you draw each line. Draw concentric circles on each knuckle, connecting points that are the same height. Flatten your hand: The lines represent different “elevations” on the topographic map of your fist.
A. Contour line. The closer the lines, the steeper the terrain. Check your map for the contour interval (the elevation change between lines).

B. Saddle, indicated by opposing U’s.
C. Peak
D. Drainage or valley, with the U’s (or V’s) pointing the same direction, uphill. Ridges look similar, with the V’s pointing the same direction, but they face downhill.
4. Learn the difference between true north and magnetic north.
A compass needle points to magnetic north. That’s not the same as true north (the North Pole, or the direction of the North Star). The difference between true north and magnetic north is called declination; it changes over time (as the Earth’s magnetic field shifts), and it varies according to your location (see below). Learn how to account for it at backpacker.com/declination.
5. Think like a railroad builder.
Traveling cross-country? Observe the landscape and imagine, “If I were a railroad engineer, where would I build the line?” You will likely choose the path of least resistance.
6. Use nature’s bumper lanes.
Ridges, rivers, and prominent peaks can all serve as route boundaries. Pay attention to the terrain that borders your route, and use landmarks to avoid going astray.
7. Avoid shortcuts.
Not only does cutting switchbacks or taking shortcuts cause erosion, but it’s also an easy way to get lost.
8. Enter the right datum in your GPS.
Technology is great—if you use it correctly. The most common GPS error: failing to match datums (the systems used to match features on the ground to coordinates on the map). For example, a WGS 84 coordinate taken from Google Earth and entered into a GPS set to NAD 27 can be up to a quarter mile off.
Never Get Lost: Get tips on using a map and compass in our book, Trailside Navigation ($13; falcon.com).