Published March 5, 2013 12:13PM
Make a Sleeping Bag Liner
Add 10-degrees of warmth to your sleeping bag with this simple DIY project.
'Sew a DIY sleeping bag liner (illustration by Supercorn)'
Silk, wicking Coolmax or cotton bag liners cost anywhere from $20 to $80, but by purchasing on-sale fabrics (anything high-quality and under $4/yard is a bargain) you can save big money and avoid upgrading to a winter bag you’ll only use once a year. The liner’s design is simple: basically a sheet folded in half and stitched together. Allow yourself a few hours to complete this money-saving project.
Supplies
– Packing paper or newsprint for tracing a pattern
– Marker
– Liner fabric that best suits your needs (fleece and silk are warm and lightweight), you’ll need about 2 yards
– 8 to 10 tab snaps (inch-long pieces of fabric with snaps on ends) that will be used to attach liner to bag (or a yard or two of ribbon)
– Thread
– Scissors
– Needle (you can hand-stitch or use a sewing machine)
Steps
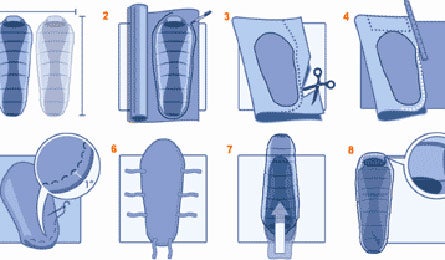
1. Lay your bag on the floor and roughly estimate the square yard surface area it occupies when zipped closed. Double this amount to come up with the estimate of how much fabric you will need to purchase. After you have your supplies, roll out the paper on the floor and place your bag on top. With the bag fully zipped, trace its shape onto the paper using a magic marker. Trace around the hood but also draw a line on the paper to mark for future reference where the top side of the bag ends (just below the chin when you’re zipped up in it).
2. Cut out shape to create your paper pattern. Lay your fabric on the floor and carefully double it over, like a folded sheet. Place the paper pattern on top of the fabric (pin it to keep it in place, if necessary) with the pattern edge flush against the folded edge of the fabric.
3. Cut the fabric around the pattern at the bottom and open side. Do not cut along the folded side.
ADVERTISEMENT
4. To make a pillow pocket, use a yardstick to draw a rectangle onto one side of the doubled material that is the same width as the top of your sleeping bag but extends approximately 20 inches above the hood (allowing enough fabric to double over to create a pillow). On the other side of the fabric, use your pattern to determine where the liner should be marked and cut to create the head opening. The top side of the liner should be cut in a straight across to be flush with the top of your sleeping bag.
5. Once your fabric is cut out, fold it in half so that the exterior fabric (the side you don’t want against your skin) is exposed. Stitch together the bottom and 3/4 of the open side. (Stitch about one inch in from the edge of the fabric.)
6. With the liner exterior fabric still facing out, sew the snap tabs or short pieces of ribbon to the bottom and both sides. The liner can be secured to the sleeping bag with two attachments equally spaced at the bottom and three equally spaced along each side. Snaps or ribbons will allow you to easily remove the liner for washing.
ADVERTISEMENT
7. Turn your sleeping bag inside out, place your liner on top of it and mark on the bag fabric where the matching snaps or ribbons need to go. Using a tack stitch, sew the attachments to the inside of your bag. Hem the top side your liner so it does not extend above your chin when you are inside the bag.
8. On the opposite side, hem around the liner where the pillow pocket will go. Double over this hemmed extension into a rectangle so that it fits inside the sleeping bag hood. Sew along the bottom and one vertical side of the rectangle so the pocket is closed on three sides and attached to the fabric underneath. This will leave the other vertical side open for stuffing a fleece or puffy jacket to create a removable pillow.
