How to Do Everything: Camp Better
'Paxson Woelber'

Find Water Anywhere
Scout it: Climb a hill and look for: stands of water-loving willows, cattails, sycamore, mesquite, Bermuda grass, or cottonwoods; large concentrations of birds in the morning; bug swarms; and cattle trails.
Dig a well: Scoop out a one- to two-foot hole on the outer bend of a sandy wash and wait up to an hour for water to seep in. Dig several holes to improve your odds. Only getting mud? Dip your bandana and wring it out to extract the moisture.
Make a solar still: Tie a plastic bag around heavily vegetated branches that are exposed to sunlight. Weight one corner with a small rock so all the moisture transpiring from the leaves will gather there. Or stuff a plastic bag three-quarters full with green vegetation (grass, cactus). Place it on a sunny slope with the vegetation at the top of the incline, so evaporated moisture drains to the bottom. Either way, a quart-sized bag will yield two to three tablespoons in average conditions.
Find tinajas: These potholes or depressions in desert rock (called tinajas in the Southwest) can hold water for weeks after a rain. Check shaded areas and creek beds–but they can also be found in unlikely places, like the tops of cliffs or mesas. and mesas.
Make Silty Water Drinkable
When a cloudy river is your only water source, try these methods before filtering or treating to keep the grit out of your teeth–and your pricey pump: 1) Strain through a bandana, or 2) let sit in a collapsible jug or cooking pot until sediment settles on the bottom.
Practice Safe Water Carrying
Slip a jumbo, nonlubricated latex condom into your first-aid kit: The super-strong multipurpose device can hold a gallon of water in an emergency without leaking.
Make a Fire in Five Minutes
1) Place three thumb-sized, foot-long sticks in a flat triangle formation; there should be enough space under one of the sticks to slip a match and light the fire.
2) Make a pile of fine tinder on top of the triangle. Rainy day? Pick up tinder material while you’re hiking and tuck it under your coat, where your body heat will dry it out.
3) Build a tipi with sticks no thicker than your thumb; space 1/2-inch apart to form a cone with a 1-foot base.
4) Place twigs (drinking-straw size and smaller) between the fuel sticks and haphazardly inside the tipi.
5) Stuff some tinder between sticks and on top of the tipi.
6) Strike a match and slide it under the tinder pile.
Find Tinder
Bark
Where to find it: Any forest
Tip: Pick up pieces of fallen bark and peel the inner layer for tinder; go for quick-burning trees like birch, cedar, cottonwood, and juniper.
Dead grass
Where to find it: Open meadows, especially in late fall and winter
Tip: Snow-covered grass will still ignite if dried under your jacket.
Moss/lichen
Where to find it: Swampy areas; look for thick sphagnum moss
Tip: Gather lots–moss burns quickly when dry.
Duff
Where to find it: The forest floor
Tip: Best bets are dry pine needles, dead leaves, and ferns.
Cattail Down
Where to find it: Riparian areas
Tip: Crush the dried seed heads in your hand to create highly combustible fluff.
Homemade
Where to find it: Medicine cabinet (100-percent cotton balls slathered in petroleum jelly); pantry (deep-fried chips, such as Fritos); laundry room (dryer lint coated with paraffin wax)
Tip: Double-bag it in zip-top baggies.

Make a Grommet
Do this to stake out grommet-less tarps or shelters: Place a small, round rock in the corner of the shelter, fold fabric over the rock to cover it completely, and tie it off with cord. Tie the other end of the cord to a stake.
Build a Stove Windscreen
1) Determine screen height by placing your largest pot on the stove and measuring from the ground to the pot handles.
2) Cut the sides off a large aluminum roasting pan (or oven liner) to form a flat rectangle with sides that match the desired windscreen height.
3) Determine screen length by wrapping the rectangle around your pot and stove so there is a 1/4-inch gap between the aluminum and the pot walls. Leave a 1-inch overlap and cut off excess.
4) Cut ventilation holes along the bottom of the windscreen with a hole punch.
5) Clip the top and bottom of the windscreen closed with binder clips when you’re cooking.
6) For even greater heat efficiency, cut a circle from the leftover aluminum to fit under the stove, making a reflective bottom.
Safety note: Do not put a wrap-around windscreen on canister stoves; you risk melting stove parts or even causing an explosion. Instead, create a wind block when cooking by propping a backpack or large rock near the stove to serve as a barrier. Be sure air can circulate around the canister to keep it cool.
Three Knots Every Hiker Should Know
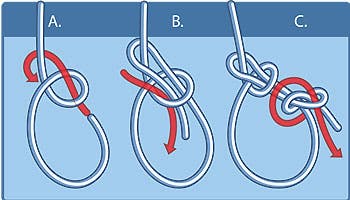
Bowline This go-to knot is ideal for hanging food bags, lowering packs off cliffs, and for use as a makeshift climbing harness.
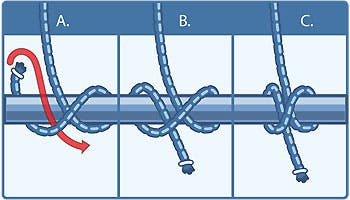
Clove Hitch A must-know for paddlers, the clove hitch is the best way to securely lash a floating canoe or raft to a fixed point (such as a tree).
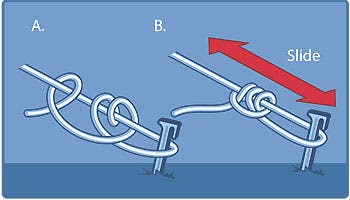
Taut-Line Hitch Perfect for guying out a tent, this knot can be adjusted on a tightened rope without releasing the tension on the line.
How to Pick the Perfect Camp
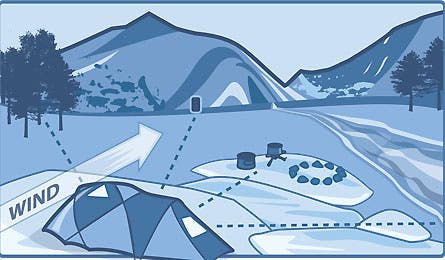
- Keep your catholes at least 200 feet from camp, trails, and water sources.
- Stash your bear bag or canister at least 200 feet downwind of camp.
- Cook at least 30 feet downwind of your tent to minimize odors that could attract wildlife. Minimize impact by choosing a durable surface (rock, sand). If fires are permitted, use a fire ring or fire pan.
- Pick a spot 200 feet (70 adult steps) from lakes and streams.
- Pitch your tent on a durable surface like a meadow, slickrock, gravel bar, or sandy beach. Choose an established site whenever possible.
How to Pitch a Tent Anywhere
- On rock: Find flat, saucer-shaped rocks weighing at least 25 pounds each. Tie 4- to 8-foot pieces of nylon cord to all of the tent’s primary stake-out points. Using a taut-line hitch, loop the other end of the cord around a rock and pull it tight. Place another rock on top of the first rock to keep cord from shifting in the wind.
- On sand: Make a deadman anchor by tying cord to one of the tent’s stake-out points; tie the other end to a thick stick, trekking pole, or sand-filled stuff sack. Bury the deadman (sticks and poles in a horizontal position) one to two feet below the surface and tamp down the sand. Repeat for all stake-out points.
- On snow: Same as with sand, but don’t use stuff sacks. Snow that melts and refreezes is hard to remove, and your stuff sacks might not survive the process. Best bet: Mountain Hardwear’s Tent Anchor ($8; mountainhardwear.com).
Camp in the Wind
- Campsite: Seek protection in low-lying, dense forests. Avoid spots among trees that show obvious signs of frequent wind, like stunted growth or bent trunks. Above treeline, scout for sites on the lee side of a rock outcropping or ridgeline.
- Tent: If it’s not raining, wait for the winds to die down (often at sunset) before pitching your tent–setup will be easier, with less risk of big gusts bending poles or ripping tent fabric. Fully stake and guy the tent out, regardless of conditions when you make camp.
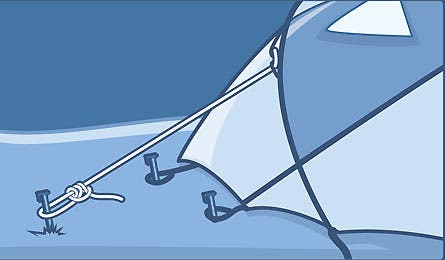
Guy Out Your Tent
Tie small overhand loops at both ends of a nylon cord (use 4-foot pieces to anchor the base and 6- to 8-foot pieces for the top guy loops). Pull one end through a guy loop on your tent’s fly, then pass the other end through the loop in the cord to fasten it. Anchor the other end to a grounded stake. Or tie cord to a stake, using an adjustable taut-line hitch knot (see right) or a rope tensioner. Guy lines can also be tied to fixed points, such as tree trunks, but not to anything that moves in the wind, like a branch or small rock.
Hang a Bear Bag
Show us a hiker who’s never had a tragicomic episode with a bear bag, and we’ll show you a hiker who’s never tried one. Use the counterbalance method for an effective–and easy!–fix.
1) Pack everything that smells–food, toothpaste, deodorant, lip balm, smokes–into a stuff sack.
2) Find a living tree with a sturdy, horizontal branch at least 15 feet above the ground.
3) Put a rock in a small stuff sack and attach it to one end of a 25-foot rope. Tie your food bag to the other end. (Leave a small ‘biner tied to your bear-bag rope and you won’t have to fuss with knots for either task.)
4) Toss the rock over the branch and pull the free end down so that the food bag is suspended midair. Make a counterbalance by attaching a second food bag (or weighted stuff sack) to the other end of the rope. Tie a loop on this end for easier retrieval. 5) Use a stick to push the counterbalance 10 feet above the ground. The food bag should be at least 10 feet above the ground, five feet below the branch, and 10 feet from the trunk. Retrieve by hooking a stick through the loop and pulling down.
Beat Mosquitoes
Travel and cook when the bugs relent, typically in the coolest and hottest parts of the day and night–even if that means hiking five miles before sunrise.
- Wear light colors, keep collars buttoned, and wrap a bandana around your head.
- Head for high, dry ground. Wind helps, too–a breeze of 7 mph will keep them away.
- Get clean. The chemicals in your sweat are like crack for mosquitoes.
- Nuke ’em. A few spritzes of DEET always works. In Alaska, we’ve dropped trou to spray our cheeks and vitals before heading out to dig a cathole.