Updated December 3, 2024 07:32PM
Gear School: Avalanche Beacons
Travel safely through snowscapes with this lifesaving locator.
'avalanche beacons'
Text by Kelly Bastone, Illustration by Don Foley
FEATURES | BUY, USE, MAINTAIN

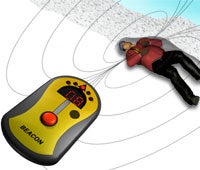
A. Basic models use colored lights to indicate search direction in receive mode; more advanced beacons use LED and LCD screens to display search data like distance and direction.
B. All beacons have a transmit/receive switch. When hiking or skiing, set your beacon to “transmit.” To search for a victim, switch
to “receive.”
C. The sending beacon’s electromagnetic field travels in a naturally curved pattern of waves called flux lines, which guide receiving beacons to the transmitter.
An internal antenna (a coil-wrapped ferrite rod) transmits an electromagnetic signal at 457kHz. Since beacons use the same frequency, they’re all compatible. Searching beacons interpret this signal as an audible beep. The louder the beep, the closer the transmitter.
Use only alkaline batteries (AA or AAA, as specified), which discharge power at a slower, steadier rate (avoiding power dips that could interrupt functionality) than lithium and rechargeables, whose output fluctuates.
Basic models use colored lights to indicate search direction in receive mode; more advanced beacons use LED and LCD screens to display search data like distance and direction.
FEATURES | BUY, USE, MAINTAIN
BUY
>> Type Choose between analog or digital. All beacons use analog technology to send and receive electromagnetic signals via the antenna. Digital models have more antennas (up to three total) that collect detailed directional data, which a microprocessor then translates into a visual readout, showing you how far and in what direction your target lies. They can be easier (thus faster) to use, thanks to more data and easy-to-read screens, but are pricier. They also have a shorter range than analog models (40 meters, versus 80) because the microprocessor sucks battery power. Choose digital for ease of use, but opt for analog to save money or for max range.
>> Features Keep-it-simple beacons, such as the digital Ortovox F1 Focus ($250, ortovox.com) and Backcountry Access Tracker DTS ($290, backcountryaccess.com), use a single arrow to point you toward the closest signal. More sophisticated devices, like the Mammut Pulse Barryvox ($450, mammut.ch), use a big screen to map the locations of multiple burials and even victims’ dead-or-alive status (by detecting subtle body movements). Advanced models require more practice or they might seem overwhelming in an emergency. Our advice: Start with a basic model and graduate to a wonkier one later.
USE
>> Practice, practice. Pros (who train often) find buried companions 77 percent faster than recreationalists (who rarely train). That makes a big difference, considering that if an avalanche victim is dug out within 15 minutes, he has a 93 percent chance of surviving. That drops to less than 40 percent at 30 minutes; and a 20 to 30 percent chance after 45 minutes. To practice, hide beacons, then hunt for them, staging various scenarios (like deep or multiple burials).
>> Make sure all searchers switch their beacons to “receive.” Otherwise, rescuers are drawn to the (unburied) rogue signal—the most frequent mistake that foils emergency searches.
>> Understand that flux lines are curved—so your path may seem roundabout. Trust your beacon’s readout. And if you’re on signal—but the distance digits are going up, not down—reverse direction. That way, you follow the shorter leg of the flux line, not the longer one (though both lead to the victim).
>> Don’t keep your eyes so glued to the beacon that you miss important clues, like a hand or ski jutting from the snow. Look around often.
>> Most mistakes are made in the pinpointing phase (the close-in search occurring within a meter or two of the buried beacon). That’s where flux lines converge and become tangled, causing the searching beacon to momentarily report illogical signals (called “spikes”). Stay calm; it only takes a second or two for your beacon to once again broadcast the correct course.
>> You’re above the person when the signal weakens in all directions.
>> For the best reception, hold the beacon in front of you with the screen parallel to the ground.
>> Wear other electronics (phones, two-way radios) on separate parts of the body than the beacon. Their magnetic signals can interfere with the beacon’s electromagnetic pulses. When searching, make sure phone/radio use occurs about five meters away from the search zone.
>> To prevent the beacon from getting ripped off in a tumble (and keep batteries warm), wear it on the provided harness under your jacket.
MAINTAIN
>> Replace batteries when the power monitor reads 30 percent—or at the beginning of each winter (whichever comes first).
>> After 10 or so years, beacons’ signals drift off the 457 kHz standard as the antenna’s magnetism fades. This makes them less sensitive and also shortens their range by half or more. Note the beacon’s farthest reach season to season; retire it once it drops off significantly, e.g. 30%.