
Heading out the door? Read this article on the new Outside+ app available now on iOS devices for members! Download the app.
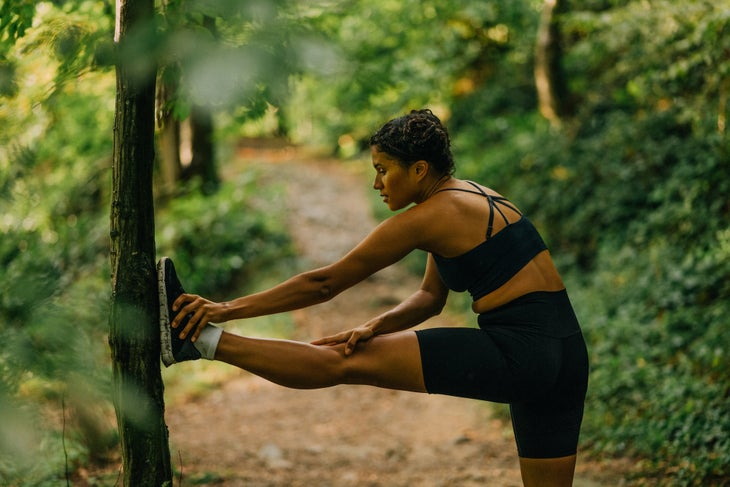
Don’t let the polished aesthetic and pointed toes fool you: Pilates is for everyone, including hikers with muddy boots and calloused feet. It’s one of the best ways to strengthen your core, and you don’t need perfect posture, a matching workout set, or fancy equipment to reap the benefits. You can do it in your living room or even in your baselayer with dirt underneath your fingernails. But be prepared to work because Pilates, like hiking, is a lot tougher than it looks.
What Is Pilates?
Pilates was developed by Joseph Pilates in the 1920s and initially gained popularity in the New York City dancing community as a method for injury prevention and rehabilitation. Early adopters found that the full-body exercise system, which focuses on core strength and spinal health, bolstered their performance by improving body awareness, mobility, and overall fitness.
Since then, Pilates has become one of the most popular forms of exercise–and not just among dancers. In ClassPass’s 2024 year-end report, Pilates topped the list of most commonly booked workouts, beating out yoga and strength training. Some speculate that the growing trend (if you can call a century-old workout a trend) is a product of celebrity influence and social media buzz. But Pilates’ real-world popularity likely has just as much to do with its wide range of benefits as its online presence.
How Can Pilates Benefit Hikers?
So, how can a workout initially created for ballerinas benefit backpackers? To answer this question, we spoke with avid hiker Maria Pertile, a master trainer and lead instructor for Club Pilates.
Core strength
Pilates isn’t just about strengthening your abs. The movements systematically engage your core in a more holistic and functional way than a set of crunches ever could.
“When we talk about the core, we’re talking about everything that will support the spine all the way out to the limbs,” Pertile says. “We’re focusing on neutral alignment of the spine, mobility of the spine, and strength of the spine. And then we’re working the appendages [arms and legs] for strength, mobility, and flexibility in someone’s best alignment to keep them safe and strong.”
In other words, Pilates won’t just give you a six-pack. It will also help you develop the strength and stability to move your body confidently over uneven terrain, maintain good posture even after hours on the trail, and carry a heavy pack without slipping into painful and problematic movement compensations.
Optimal breathing
Ever find yourself holding your breath on more advanced trails or during intense workouts? Pilates can help you break that bad habit. Breathing is an intentional part of any Pilates workout, and most instructors will offer specific cues on when to inhale and exhale to get the full benefits of each movement and bring more oxygen into your body.
“There are a lot of benefits to oxygenation of the blood,” Pertile says. “You’re more energized, and [breathing] allows people to learn how to relax in different situations.”
Mobility and flexibility
Pilates improves overall flexibility and mobility by moving your body in all directions. Building strength and stability in your joints’ full range of motion can help you move without pain and prevent injuries.
Plus, Pilates can help diversify and round out a hiker’s movement repertoire to balance out your body and prevent injury. Hiking typically keeps you moving in the sagittal (forward and backward) plane. However, a regular Pilates practice ensures that you’re also building strength and stability in the frontal (side-to-side) and transverse (rotational) planes of motion.
Balance
How many hiking-related injuries start with a little trip or stumble? Pertile explains that Pilates improves your body’s alignment and develops balance so that “if you trip, you can pull yourself back in.” Your center–your core–is a stabilizing force that can help you conquer sources of instability, like loose rocks and slippery mud, and avoid serious falls.
Resilience
Of course, accidents will still happen. If you find yourself temporarily sidelined with an injury, Pilates can be a great option for building and maintaining strength while you’re off the trail (with a doctor’s approval, of course).
Anecdotally, Pertile also finds that people who do Pilates tend to bounce back from injuries at a faster rate than those who don’t practice.
“Two years ago, I tore my ACL backcountry skiing,” she says. “Because I had done Pilates, I was able to recuperate so much quicker. I see that with injuries time and time again. People are able to get back on the trail quicker because they’re learning to work their body in its proper alignment, which helps strengthen you and get you back to where you need to be to heal.”
Beginner-Friendly Pilates Workout for Hikers
Developed by Pertile, the following Pilates workout takes about 20 to 30 minutes. You’ll need an exercise mat (or padded surface) and enough open floor space to fully extend your body with arms overhead and sit with your legs outstretched in a V-shape.
1. Abdominal Series of 5
Do 8 to 10 reps of each of these exercises in order. Transition from one exercise to the next without taking a break.
Start on your back with your head and shoulders lifted off the mat. Engage your abdominal muscles, ensuring your lower back maintains contact with the mat. If your lower back is overarching, try raising your legs slightly. You can also rest your neck by lowering your head to the mat for a few seconds or using your fingertips to help support your head.
Single-Leg Stretch
- Bend your right knee, draw it toward your chest, and place your right hand on your right shin and your left hand on your right knee. Hover your left leg straight above the ground and inhale.
- Switch the position of your legs, drawing your left knee toward the chest and extending your right leg. Clasp your left shin with your left hand and your left knee with your right hand. Exhale as you complete the switch.
- Continue to switch legs and hands, exhaling with each rep.
Double-Leg Stretch
- Begin with your knees bent to a tabletop position, torso raised in a curl, and your hands on the outside of your shins.
- As you extend your legs out, bring your hands to your ears as if taking off a top hat and extend your arms. Inhale.
- On an exhale, circle your arms to the sides, down, and forward as you draw your knees to a tabletop position with your hands on your shins. Place your palms on your shins to hug your knees in.
- Repeat.
Scissors
- With extended knees and elbows, lift your arms and legs straight up above your torso.
- Clasp the back of your right calf with both hands. (If you need to, you can bend your knee slightly and hold the back of your thigh.) Lower your left leg toward the ground. Point your toes.
- Exhale as you use your back muscles to gently pull your right leg toward your chest two times.
- Inhale as you switch your legs and grab the back of your left calf or thigh. Again, exhale as you pull your left leg toward your chest two times.
- Continue to inhale and exhale as you switch legs.
- Repeat.
Lower Lift
- Interlace your hands behind your head and gently curl up with legs extended straight up above your torso, heels together, and pointed toes apart.
- Keep your legs together and core engaged as you lower your legs toward the floor on an inhale. Go only as far as you can while maintaining a connection with your core, between your lower back and the ground.
- Exhale as you lift your legs back to the starting position.
- Continue to inhale and exhale as you lower and lift your legs.
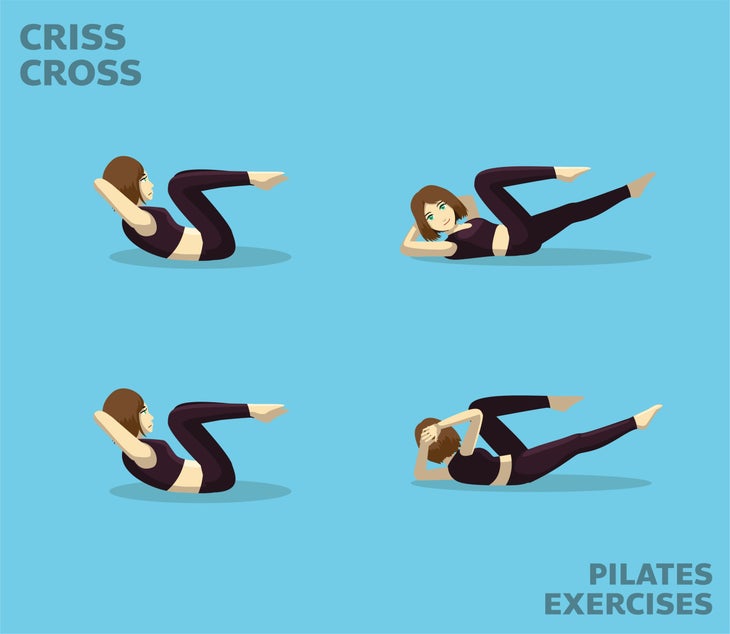
Criss Cross
- Interlace your hands behind your head and lift your chest while keeping a neutral spine. Bring your legs to a tabletop position. Inhale.
- Exhale as you rotate your torso to one side while extending the opposite leg. Maintain core stability and keep the bent knee directly above the hip.
- Inhale as you bring your torso back to center.
- Exhale on each twist as you switch, extending the other leg and rotating the opposition direction.
- Repeat.
2. Bridge with Alternating March
- Start flat on your back, arms at your sides, knees bent, and feet planted on the floor in front of your glutes.
- Engage your core and hinge at your hips to lift your glutes off the ground and into a bridge position.
- From a bridge position, exhale as you lift your right knee up to a tabletop position so the knee is directly over the hip. Pause for a moment, keeping the toes pointed.
- Lower your right leg on an inhale.
- Exhale as you lift your left knee, toes pointed, to a tabletop position. Then, inhale as you lower your leg.
- Repeat. Do 8 to 10 reps per leg. Exhale to lower the spine in a straight position.
3. Roll-Up
- Start flat on your back with your arms overhead and your feet flexed.
- On an exhale, bring your arms forward, gently tuck your chin (think about holding an apple in front of your neck), and use your core to roll up to a seated position one vertebra at a time. Be careful not to let your feet lift off the ground. Keep your heels planted and your feet flexed.
- Inhale as you roll back down to your starting position, slowly and one vertebrate at a time.
- Repeat. Do 8 to 10 reps.
4. Plank into Side Plank
- Start in a standard plank or push-up position. Stack your shoulders and elbows directly over your wrists. Maintaining a flat back and neutral neck, engage your core and glutes. Breathe naturally and hold the position for 30 seconds.
- Then, transition to a left side plank. Swivel your heels to the left so that you’re balancing on the side of your left foot. Extend your right arm toward the ceiling as you rotate your entire body to the right and balance on your left arm. Keep your core engaged and back straight, being careful not to let your left hip dip toward the ground. Hold for 30 seconds.
- Swivel your heels to the right and immediately transition into a right side plank. Extend your left hand toward the ceiling and balance on your right arm. Again, keep your core tight, and don’t allow your hips to sag. Hold for 30 seconds.
- Rest for 30 seconds and repeat the sequence two times.
- If you’re still working up to a 30-second plank, you can take quick breaks as needed throughout the exercise. Also, you can modify the side plank by lowering your knee to the ground.
5. Swimming
- Lie face down with your arms extended overhead, palms down, and your legs straight, toes pointed.
- Engage your core by drawing your navel to your spine to support your lower back.
- Maintaining a neutral neck, lift your legs, arms and chest off the ground.
- From this position, “flutter” your arms and legs by alternately lifting and lowering your limbs by an inch or two. Don’t allow your arms or legs to rest on the ground.
- Inhale for 5 counts. Exhale for 5 counts for a total count of 50.
6. Single-Leg Kick
- Start face down with your forearms on the mat, palms down, and your chest and shoulders lifted. Your elbows should be stacked under your shoulders, but you can scoot your elbows forward if your back is tight. Draw your legs together and engage your core as you press your pubic bone into the mat and engage your abdominals away from the floor.
- Keeping your toe pointed, bend your left knee and quickly kick your left heel toward your glutes two times. Return your left leg to the mat and switch to the right, quickly kicking it toward your glutes two times. As you bend, kick, and lower your leg, keep your pelvis and torso as stationary as possible.
- Continue to alternate. Do 8 to 10 reps per side.
7. Saw
- Start in a seated position with your legs extended and opened in a V shape. Extend your arms out to the sides.
- Inhale to sit up straight and twist your torso to the right.
- Exhale as you lean forward over your left leg and extend your left arm to “saw off” your pinky toe with the blade of your left hand. Keep your abdominals lifted and your hips on the ground as you extend your right arm behind you, palm facing up. Look behind you, but don’t strain your neck.
- Inhale to roll up through your spine while maintaining the twist.
- Exhale to return to start, and repeat on the opposite side.
- Continue to alternate. Do 8 to 10 reps per side.
From 2025