Backpacker Photo School: Understanding Aperture, Shutter Speed, and ISO

Photography is an art form, but understanding exposure is part science and part math. Lucky for us, the camera does the calculations: As photographers, we just need to understand the images we’re trying to create, and which dial to adjust for the desired results.
In photography, light hits either film or a digital camera’s sensor to record an image. There are three factors in how much light is recorded: aperture, shutter speed, and ISO. Because the final exposure combines these three factors, you can use many combinations to record just the right balance of light. But it helps to know what these terms mean and how they affect the final image.
Aperture
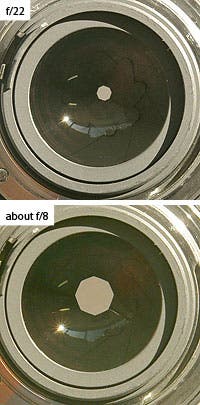
The aperture is the hole that allows light into the camera. Casually, both aperture and f-stop refer to the size of the hole, which regulates the amount of light that can enter at once. In the photos of a lens at the left, you can see the aperture when it’s at its smallest and when it’s opened some. When you walk from daylight into a dark room, your pupils enlarge to try and gather more light; the same is true with aperture. When you go from shooting in lots of light to shooting in a little light, you’ll want to open up your aperture to gather more.
Aperture size is not a direct measure of the diameter of the hole—it’s calculated by dividing the focal length of the lens by the actual diameter of the hole. The camera does the math, but knowing this explains why it’s written as a fraction with f over a number. Common apertures are f/4, f/5.6, f/8, f/11, f/16, f/22. (Notice the pattern: The numbers 4 and 5.6 are doubled and then those numbers are doubled. They can also be halved if your lens has wide apertures.) Between each of these aperture settings is one stop. On cameras, you can adjust by halves or thirds of a stop, so in addition to the full f-stops you’ll see lots of other options.
Because aperture is expressed as a fraction, a higher number correlates to a smaller hole, which lets less light in. An easy way to remember this is by thinking “22 is teeny-tiny.” It’s not exactly scientifically, but it can help you remember.
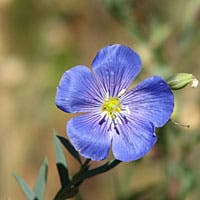
Aperture affects the amount of depth of field in an image, or how much of the image is in focus. When the aperture is wide open (low number, like f/2.8 or f/4) you’ll get a shallow depth of field. Only things that are between 12 and 18 inches from the lens will be in focus, while large portions of the foreground and/or background will be out of focus. This can be a good thing—either for artistic effect, or to direct the eye to a certain part of the photo. The flower photo at the top of this post was taken with a large aperture to throw the background out of focus. At other times, you will want more of the image in focus. The shot may require everything from 12-40 inches away in focus, or everything from 8 feet away to that very distant mountain. If not enough is in focus, you’ll want to decrease the aperture size or “stop down.” (Remember: This will be an increase in the f-stop number you see. )
Shutter Speed
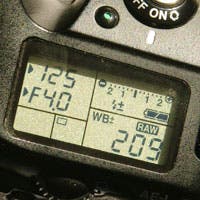
The shutter speed determines how fast the shutter opens and closes—basically, the amount of time light is allowed to enter the camera. Shutter speed is normally a fraction of a second, something like 1/500-, 1/250-, or 1/125-of-a-second. On the camera it may simply be displayed as 500 or 125 as shown at the left. Because it’s a fraction again, the larger number means light will come in for a shorter amount of time.
As with aperture, between each of the examples I gave there is one stop of light, or twice as much. If you’re trying to go farther in either direction, keep multiplying or dividing. In addition to these shutter speeds, you will see the half stops, or thirds of a stop, as options on your camera.
When taking a picture, you may need to increase the shutter speed if the subject of the photo is moving and you don’t want blur in the image. Or you can decrease the shutter speed to purposely create motion blur. Generally, shutter speeds need to be faster than 1/60 unless a tripod is used. If the shutter is open too long with a hand-held camera, natural body movements will create an unintentionally blurred image. This is called “camera shake.”
ISO
ISO is a measure of the sensitivity of the film or the sensor. The more sensitive it is, the more is reacts to the light that comes through to hit it. ISO numbers display as 100, 200, 400, 800, 1600 and up. As the ISO is increased, the camera’s sensor detects more light. To take pictures in light-compromised environments, you’ll want to increase your ISO.
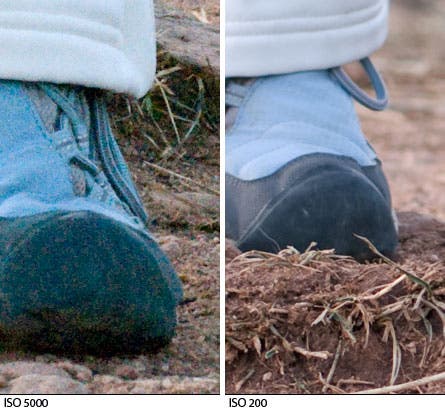
But if you increase the ISO too much, the camera will be over-sensitive to light. The camera will be working so hard to detect light it will be guessing to fill in some spots, and perhaps guessing wrong. This is why you might end up with grainy, speckled images or little purple or green flecks in your blacks—what photographers call “noise.” Every camera has a limit to the ISO performance. If your digital camera is a few years old, you probably need to stay below ISO 400 for acceptable print quality. If you camera is newer it can probably go higher, but the highest acceptable ISO will depend on the brand and the model. You should experiment to find out what the highest acceptable ISO is on your camera.
For this example, I cranked my ISO much higher than acceptable so you would be able to see the noise and grainy texture I’m talking about. As a small jpeg in this blog, it’s noticeable. The comparison below shows a part of the photo, closer to the original size and part of a low ISO photo, so you can see the actual difference. What is slightly noticeable as a small jpeg would be completely distracting when viewing the photo large or printed.
To create the examples for this blog, I went out late in the afternoon while light was dim. The lack of light enabled me to set the camera to extremes and make visual differences very noticeable.
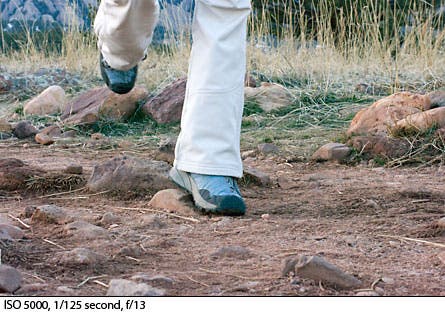
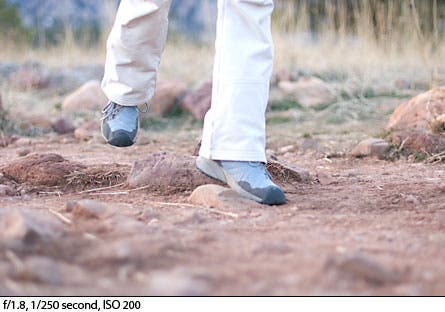
With my ISO at an acceptable level, I used a wide-open aperture to collect enough light for this shot. Because of the large aperture there is a very shallow depth of field. The area in focus is only right around the leg and foot. Because so much light came through the aperture at once, the shutter speed was fast enough to stop the motion of a walking person.
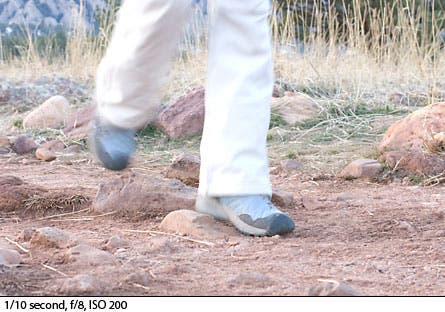
In this example the shutter speed is much slower, so motion gets accentuated by blurring. I also get a greater depth of field: Notice how more of the photo is in focus, and the background is more in-focus than the previous example.
In daylight shooting, you likely won’t have to go to such extremes. If you take a shot and realized you want the background slightly blurry, you’ll just adjust the aperture a stop or two wider. Then adjust you shutter speed that same number of stops faster to make sure the overall exposure stays the same. If you need to speed up the shutter to stop some action, then either increase you ISO or open up the aperture.
If you’re looking for some inspiration, visit Michael Clark’s website and think about his exposures. Can you tell which of his photos are taken with long or short shutter speeds or large or small aperture?
Since this is a lot to remember while in the field, we created this handy-dandy cheat sheet. Download it, print it out, and take it with you!
—Genny Wright Fullerton
Image Credit: Phyllis Drake (top); Genny Fullerton (6)