BACKPACKER Photo School: Rule of Thirds


Ever look a bunch of photos and just feel bored? Most likely the photos were taken with the subject in the center of each shot—the photographer probably used a point-and-shoot and, well, just pointed and shot. But no matter what kind of camera you’re using, there’s the opportunity to craft better photos simply by following the Rule of Thirds.
The point of the Rule of Thirds is to avoid placing the photo’s subject in the center and avoid dividing the photo directly in half. Do this the easy way: Imagine dividing the space in your viewfinder by thirds with imaginary horizontal and vertical lines. Then, place your main subjects along those lines. You can use real objects—the horizon, trees, or anything that creates a separation between two areas—to clearly mark those lines. You can even divide the space with the foreground and background.
Choosing to put the subject or divisions along your imaginary lines will automatically make the photo more interesting to look at. Your eyes will wander around the whole picture, instead of staying glued to the center, and you’ll want to look at the photo for longer. Let’s look at a few applications:
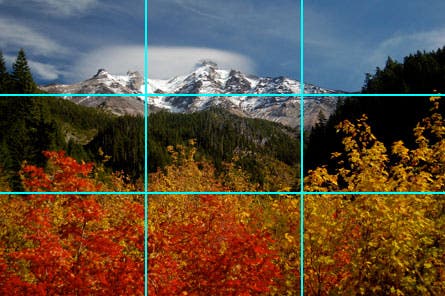
I love this reader photo of Mt. Jefferson, in Oregon, sent in for our Fall Foliage Slideshow. It shows the perfect application of the Rule of Thirds. The bottom third is foreground: pretty, bright yellow foliage. The mountain is along the line I drew for the upper third. The dark bush on the right also takes up about a third.
Don’t bother being too exact about your thirds; some people would say you have to put the subject at the intersections of the imaginary lines, but I don’t think you have to be quite so strict. The point of this rule is to avoid everything converging around the center. As an example, I cropped one of my photos in two different ways. Which of these do you find more interesting to look at?
The one on the right features a very centered subject. In the one on the left, the hiker is still the main subject of the photo, but she’s not centered. Also, keep in mind that there are other things to look at in the photo. The photo has 3 horizontal sections: grass, trees, and sky. The photo on the right is divided exactly in half with grass on the bottom half and dark green trees on top.
Keep in mind, this doesn’t mean you should always shoot wider to show more of the surroundings. Almost every time you take a photo, you should decide where to put the horizon line. Moving it up to the top third of the photo changes the angle of the photo. What’s not shown in sky is converted to foreground, which brings the scene closer to the viewer.
Here’s a photo where I followed the Rule of Thirds by putting the horizon higher than center. I made a frame around what would have been included if I had centered the horizon. By following the Rule of Thirds, the framing I used will draw a viewer from the bottom of the photo out into the rest of the scene.
Of course, sometimes the sky is the interesting part of the scene, and then it makes sense to move the horizon line down instead of up. This often happens with beautiful sunset photos, where the ground is mostly black and the sky is illuminated and colorful, like in this photo entered into our Reader Photo Contest earlier this year.
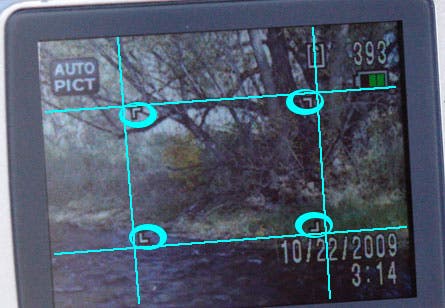
Here’s a little trick I use to remind myself about the Rule of Thirds: A lot of cameras I use have markings on the viewfinder or the screen. They’re usually lights to show where my focus is, or cursors that show the center. When I see these, I think about where they align in comparison to the center of the photo, or in comparison to the lines dividing my photo into thirds. Then I know when I’m taking photos whether to keep my subject away from those marks (if they’re centered), or use those as suggestions of where to put my subject (if they’re where my imaginary lines would intersect, like in the photo below).
So next time you’re ready to snap your next portrait or landscape, think of the Rule of Thirds first. It’s the easiest thing you can do to keep your point-and-shoot shot from looking like one.
—Genny Fullerton
Photos by (from top) Clint Sturdevant, Genny Fullerton (2), John Hawkins, Rita Marie Gordon