Backpacker Photo School: Light Direction


Photography is all about light. The subject is important, sure—but a photo always captures a subject in one particular lighting situation.
Light has two properties: quality and direction. We already talked about one quality of light in our cloudy day lesson. But when it’s not cloudy, direction of light becomes even more important.
Direction of light is defined by its direction in relation to the subject. Light can hit any subject in three basic ways: from the front, side, or behind.
FRONT LIGHT
Front light is the easiest to photograph. It means you’re aiming your camera in the same direction the light is shining. Light within the scene will be fairly even because it’s hitting everything. The shadowed side is hidden in the back. This means your photo won’t show shadows if it’s perfectly framed in direct front light. Some people call this light boring because of the lack of shadow, but if you’re just trying to capture a scene naturally, this is the easy way to do it. Most people who pick up a camera can make it look nice with front light.
Light coming from directly above can also be front light if you’re shooting down along the same trajectory. For example, if your camera is aimed down to capture footprints in the mud and the sun is directly overhead, the footprints will be front lit. If you wait for the sun too move a little, or move the camera slightly to one side, you will show a little of the shadow and get more dimension in the resulting photograph.
SIDE LIGHT
Side light happens when light comes at the subject from a different direction than the camera is pointing, as long as it’s not the exact opposite direction. Most of the time this means the light is coming from what will be the left or right side of the finished photograph. In photos with sidelight, the subjects have a lit side and a shaded side. The contrast between those sides works well for showing three- dimensional shapes. Mountains that appear flattened by front light show off their curves, cliffs, and crevasses when light hits them from the side.
Light from directly above the subject can also create side light. For example, if you’re shooting petroglyphs on a vertical wall at noon, the light will probably come from straight above. Your photo will show the texture of the rock more than if the light was shining directly onto the rock wall from behind you, or if you were shooting in complete shade.
BACK LIGHT
When the camera is pointed directly at the light source, with the subject of the photo in between the camera and the light, you’ll encounter a back-lit situation. This is the trickiest type of light to shoot in, especially if the light source is very bright. But, it’s also the most interesting. This is how you illuminate the edges of objects, and create sun flares and other fun things like that. It’s very similar to what happens during a solar eclipse.
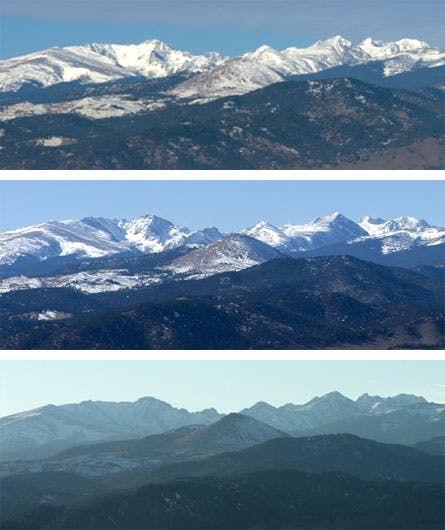
This post started with three photos of the same mountains in the morning, around noon, and in early evening. You can see the way the shadows change and move through out the day. We watch this happen every day in Boulder, where the mountains are to the west of town. The easiest time to shoot our mountains is morning. As the sun moves around from the east to the south (in the winter anyway) there’s a time when shadows appear and give the mountains shape, but the mountains overall are still front lit enough to be illuminated and alive.
When you’re on a hike, the light source is the sun, so you can’t change where it’s coming from. And, of course, you’re not going to be able to get the mountains to move, either. The trick is to look around at the location you’re in and decide what to photograph based on the current circumstances, or, knowing that the sun is moving west across the sky, learn how to predict when the light will favor the subject of your photo.
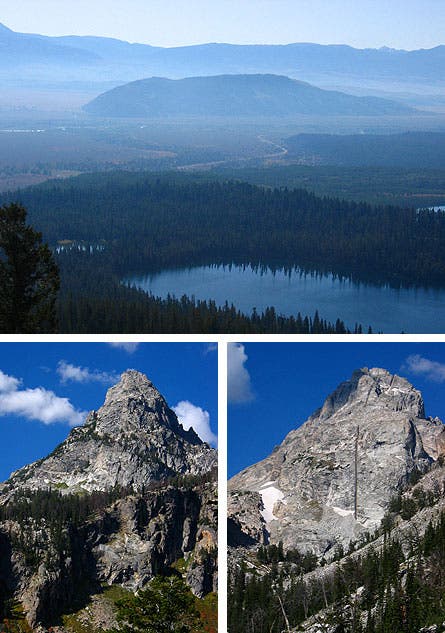
When I hiked in the Tetons, our view was to the east and things were back-lit all morning. As we climbed up the canyon, we began to see mountains that were front-lit and side-lit surrounding us. The actual direction of sunlight didn’t change much between the times these photos were taken (less than an hour passed), but the direction of light on these three subjects was very different because of where they were in relation to where I was shooting.
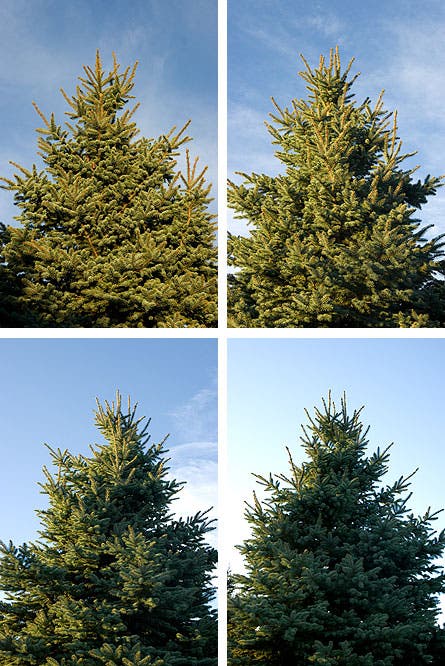
Here’s an example of walking around a tree, and seeing how the light plays on the branches from different directions.
With a little bit of practice, you’ll soon be able to use the sun to light your scenes for the perfect photo. You just might need to get up early to do it—the sun waits for no one!
Need inspiration? Check out Lewis Kemper, a California photographer who has lots of great photos using every kind of light. One of my favorites is this one.
—Genny Wright Fullerton