Backpacker Photo School: Fall Foliage Expert

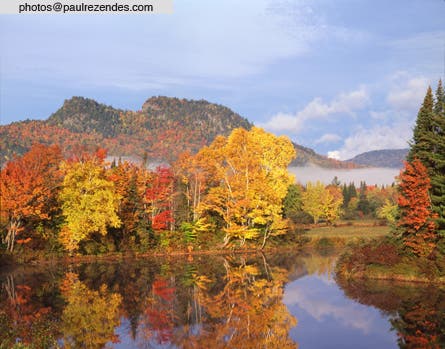
Diamond Peaks and Magalloway River, Magalloway, ME Original: 4x5 inch color transparency AG: 169


A few weeks ago, we asked you to send your best fall foliage photos for a slideshow. You sent some beautiful images (and it’s not too late–send your shots to us right here: readerphotos@backpackercom)—but we aren’t going to publish that slideshow just yet. First, we’ve asked Massachusetts resident and BACKPACKER contributor Paul Rezendes to help us improve our fall foliage skills. You might know his name from his field guides: Tracking and The Art of Seeing: How to Read Animal Tracks and Sign, and The Wild Within: Adventures in Nature and Animal Teachings. As a professional nature photographer for over 25 years, Paul’s got plenty of experience to share, so we asked him to explain the technique behind four specific photos.
Check it out below then see a Gallery of Rezendes’s images right here.

Backpacker: Let’s start out with this broad photo showing lots of beautiful scenery. Where is this photo taken?
Paul Rezendes: This photo was taken while on assignment for Dartmouth College. They own College Grant, a piece of land the size of a New England town located in New Hampshire. It is an undeveloped wilderness area along the Maine border just south of Canada. It was my job to photograph it through the seasons. This entailed lots of scouting, traveling with my all-wheel-drive van and hiking heavy camera gear long distances. The Diamond Peaks were a prime landmark on College Grant, although I’m actually standing across the border in Maine. This spot had lots of potential: the water for reflections, and the low-lying area for possible ground fog. The view faced mostly west, so I didn’t think it would work for a sunset because of the Diamond Peaks in the background. I didn’t want the mountains backlit and casting a shadow over the foreground of water and trees.
BP: What else made you choose this particular moment to shoot the photo? Did you take any specific environmental conditions into consideration?
PR: I would also have a better chance for ground fog in the morning. I waited for the foliage to peak, then visited the same spot for two or three mornings until the magic happened. I needed it to be very still for reflections, and I didn’t want any movement in the trees. If there was wind, I wouldn’t have had a shot. Sometimes you have to be very persistent in visiting a place before it all comes together. If the foliage is a little wet in the morning when the first light comes in, it can be spectacular. I had to wait until the light fully covered the scene so that it would be evenly lit.
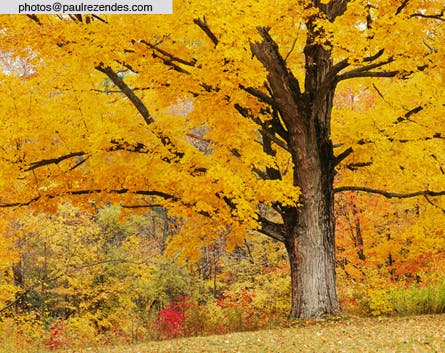
BP: In this next photo you got much closer to the foliage—I almost feel like I’m there. Where did you find this tree?
PR: This sugar maple is on an old farm less than two miles from where I live. I have to drive by it whenever I leave my home, or when I’m going home. Sometimes a photo may be close by. You may drive by it, or hike by it every day, literally. I have driven by this tree for nearly 30 years and it has never been a shot except one day a few years ago.
BP: So everything came together for one moment and you photographed it then?
PR: I had been out and about trying to find that special foliage shot, and was on my way back home. It was overcast, making the light very soft and even. (This is really good light for foliage.) As I turned the corner and the tree came into view, I was just stunned. I would have been knocked off my feet if I hadn’t been driving! I really like it when it happens this way: At first, you may not know what it is that took your breath away. It’s one thing to see something beautiful, but what is it that really hit you, moved you? That’s what you have to photograph. The tree was uniformly yellow, and the background was mostly yellow. All this yellow really made the trunk stand out, made it very graphic and strong. All I had to do was frame it right.
BP: Tell us about the way you chose to frame it.
PR: I didn’t want to have the trunk in the middle, as that would have weakened the picture. So I put the trunk 2/3 to the right of the frame. This also allowed me to have some branches moving off to the left of the photo. I was also happy with the splash of red in it, which, with the dark trunk and branches, accentuated just how yellow everything was. I find that it is important to find out just what it is that moves you about a scene, and then bring that, and just that, into the frame.
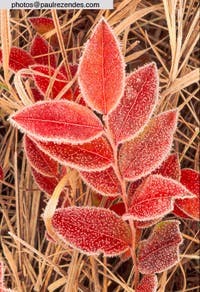
BP: In this next still life, you managed to find emotion in a pattern of leaves you personally arranged. What’s your technique for making little arrangements like this? How do I start?
PR: I don’t do this type of photography very often, but I sure do enjoy it. I started collecting leaves with the very intention of arranging them for a photograph. Arranging them was a very meditative process for me. First I needed a background that was not bright, but rather something evenly-colored. I want the viewer to see the leaves when they first look at the photograph. I found some pine needles that seem to fit the bill. Pick a flat spot on the ground, as this helps keep everything in the plane of focus.
BP: How do you decide what leaves to put where, which to turn upside down so it doesn’t look like a pattern, or like it’s too planned out?
PR: That’s tricky! I don’t try to figure it out in my head. Thought just gets in the way. See if you can just let your eye do it. I’m serious: I feel that art happens at a deeper level than thought. Try arranging a large number of leaves, in an area larger than you intend on photographing. Then start to frame different sections with your camera. Again, don’t think about it too much, just play with it, have fun, until something clicks for you, like your shutter!
BP: Do you use a tripod, so you can leave the camera, move things around and come back without having to reframe?
PR: Yes, I used a Gitzo tripod for all the photos you’re showing here.
BP: But sometimes you don’t need to arrange anything for a photo—like with this branch of blueberry leaves you found in just the right position.
PR: Unlike the leaves above, sometimes it is already arranged for you. Watch out (so) you don’t step on it! And it might not be what you’re looking for, so stay open, don’t get too focused on what you think you want. On this particular photo shoot, I was focused on photographing a beautiful freshwater marsh with colorful fall leaves on the trees along the bank. It was a cold morning and everything was filled with frost. As I packed up my camera and was stepping away, I happened to look down (and see) a gift. It would have been so easy to miss. It was an overcast day, with that soft, even light that makes this photograph possible. If it was a sunny day, there would have been deep shadows and bright spots which would have distracted from the delicacy of the leaves and frost.
BP: The next photo might be my favorite. The foreground really makes this photo special—the colors are so bright. Can you tell us a bit about making this image?
PR: This is a rather difficult shot. It is partly backlit. That is what makes the colors so bright. If you haven’t got overcast, even light to work with, or a day when there are showers on and off, to keep the leaves wet and vibrant, the sun can work for you in different ways. As I mentioned previously, work at getting your shots in at the first or last light, when the sun is low, and the light is warm. Later on, as the sun rises, it reflects off of the leaves. This reflected light has a lot of white in it— shiny stuff—so the colors don’t come through. This is where a polarizer comes in. A polarizer will cut the glare that is coming off the leaves, so that the color is more saturated. I used a polarizer for this shot for that reason, and to get a blue sky. I was unable to get the whole sky blue (unless I wanted to fool with it in Photoshop), because I was too close to the sun, but the photo still works.
BP: What about the red bushes in the shot? What are they?
PR: The vibrant red shrubs in this photograph are huckleberries, a variety of blueberry. They are found all over Acadia National Park, where this photo was taken. High-bush blueberry also turns a nice red, but not like the huckleberry. Low-bush blueberry also turns a vibrant red, sometimes creating a carpet of red across an entire field. Virginia creeper can turn an incredible red and can really make a nice shot, as it’s a vine that loves to climb tree trunks, creating a nice combination. Even poison ivy turns a really bright red, and you might even be able to photograph it with its white berries. Let’s not forget water lilies…their leaves also can turn into some very interesting colors.
More of Paul Rezendes’s fall photos are displayed in this slideshow. Click over and get inspired, then send more fall foliage photos to readerphotos@backpacker.com for our Reader Photos fall foliage collection. Be sure to put “Fall Slideshow” as the subject line and your name and hometown in the email message.
If you’d like to purchase prints of Paul Rezendes’s photography, calendars, notecards, or books they’re all available on his website.
All images copyright © Paul Rezendes. All rights reserved. No personal, public or commercial use permitted.
—Genny Fullerton