Backcountry Photography, Part 1 of a Series


Sorry to be slow on the blog, readers. I’ve been using this eeky economic slowdown as an opportunity to reorganize my chaotic photo files and put together a website. In short, I’ve been on remote assignment in computer hell.
There is an upside, however. Looking at all those adventure images has swung the needle of my mania meter back from writing to photography. So I thought I’d pass along that bubbly enthusiasm by imparting some practical lessons learned during 25 years of hauling big cameras into remote wilderness. For this first installment I’ll cover camera-carrying.
You’ve done it, I’ve done it: Hauled a big, heavy Nikon or Canon on a long trek and come back with nothing, because you never stopped to drag it out of the pack. In order to get good photos on the trail (and still get anywhere) you’ve got to keep cameras handy, accessible within seconds. That’s not a problem with small Point & Shoot models, which can easily be stuffed into a pouch on hipbelt or shoulder strap, but carrying bigger SLR (single lens reflex) cameras, you need a secure, comfortable chest harness, simply because most SLRs are too bulky to allow any arm swing when mounted on your hipbelt.
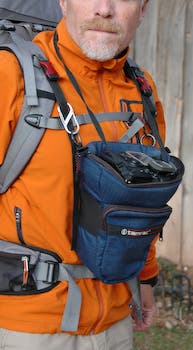
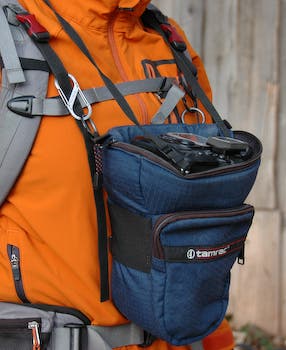
My favorite system is to use a top-opening, “holster” style camera pouch, and mount it directly onto my backpack’s shoulder harness so it hangs in the center of my chest. I’ve found that LowePro, Tamrac, and M-Rock all make excellent holsters, depending on the exact dimensions of your camera-lens setup. In general, Lowepro’s AW (all weather) line seems the most stormproof, M-Rocks seem the toughest, and Tamracs (particularly the simple 515 and 517 models) seem to carry best.
You can also use a separate chest harness for the holster, wearing it underneath the backpack rig, but I’ve found that separate harnesses are less stable, and the camera weight hangs heavily on your neck. Mounting the chest harness directly to your pack also helps counterbalance both payloads, allowing you to stand straighter. For really quickdraw action, you can just carry the case open, and loop the camera’s strap over your neck for safety.
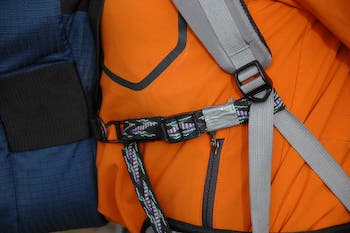
Over the years I’ve settled on the simple attachment system shown above. It uses three, half-inch wide straps and three mini-biners. I mount two half-inch straps off the load-lifters (or D-rings if available) on my pack’s shoulder harness, attaching them about collarbone height. The third strap is run through the lower left D-ring on the camera holster, then looped around the bottom, unpadded portion of the left shoulder strap. I often wrap a few bits of duct tape on these three straps so they’ll hold position, I can adjust them one-handed, and they won’t get lost around camp. To exit the rig I just undo the upper right strap and climb out.
The lower, third strap keeps the holster from swinging around while I’m hiking, or banging me in the face every time I bend over. For skiing, I’ll sometimes add a fourth, lower strap on the right, for added stability, because skiing, boarding or jumping with a chest harness can get you an uppercut to the jaw. For walking around camp, I just clip a neck strap onto the holster and carry it bandolier style. Webbing waist belts work too. Spare batteries, memory cards and lens cloths go in the front pouch of the chest holster. Extra lenses get carried in various accessory hipbelt pouches. Outdoor Research insulated Water Bottle Parkas work well for carrying large zoom lenses.
The last thing I haul is a tripod. All serious photographers have a love-hate relationship with “sticks” because they’re heavy, a pain to deploy, and most of the time you just carry them. But they’re the only way to get decent photos in morning and evening light, and are a necessity for most landscapes, camp scenes and solo trips. The only time I’ll leave them behind is when I’m shooting action photos with a group of people, or I’m on a personal trip where snapshot senics are cool. Choose a tripod with a ‘ball head,’ not a pan-tilt (video-style) head, because ball heads are much quicker to level and aim. Some hikers stick with tiny ‘tabletop’ tripods, which weigh mere ounces, but I’m never able to place the camera where I want it.
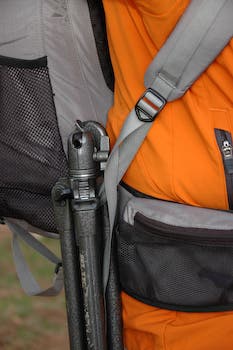
The tripod pictured here is a SLIK SBH 100, the “Sprint Mini GM.” Since it’s only 1 lb. 12 oz., it’s light enough to carry ‘sword’ style on the bottom of my backpack strap. This quick-draw position is way handy for on-the-move shooting, but the SBH100 doesn’t extend very high (42 inches, rib height on me). On big, bad assignments I’ll haul a Gitzo Mountaineer that weighs 4 lbs. 4 oz., because it’s stable enough for big telephotos and extends to above head-height, which is often useful for camp scenes. But four pounds is a huge travel penalty.
Chest harnesses do interfere with steep scrambling. Carrying big cameras, it can be disconcerting at first not to be able to see your feet all the time. But a good rig that keeps your camera handy means you’ll get to relive your adventure over and over.
If readers have any other specific questions about trail photography and gear, ask ’em in the comments section below. I’ll try to answer promptly. Cheers. Hike safe. — Steve Howe