The Manual: Travel Off-Trail
Navigate across scree, snow, and rivers without getting blocked or lost.
Plan Your Route/Keep Your Bearings | Travel Across Scree & Boulder Fields | Map Folding 101/Master Snow | Cross a River
When you venture off the trail—whether to climb a remote peak, find a hidden lake, or ascend a snowfield—you, not a trail-builder, have to decide the best route over wild ground. BACKPACKER’S new book, Trailside Navigation ($13, falcon.com), teaches you how to do just that. Learn these backcountry skills, and you can be comfortable exploring any terrain.
Plan Your Route
This might sound obvious, but writing down a detailed travel plan forces you to look closely at your map and the terrain. The plan should include:

>> Starting point and estimated time of departure
>> Destination and estimated time of arrival (an average off-trail pace is one to 1.5 miles per hour)
>> Distance and elevation gain
>> Detailed route description—including handrails (features, like a river or a ridge, that keep you moving in the right direction), landings (key spots, like a lake or saddle, that you tick off as you go by, just as landings on a staircase indicate the passage of floors), and ETAs for these points
>> Potential hazards (cliffs, river crossings, boulder fields, snow, and so on)
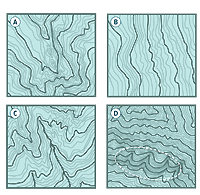
With practice, you’ll learn what features make a good line of travel. In general, look for ridges to follow (A), or gentle slopes to contour around (B). Valleys and gullies (C) make great handrails, but make sure they’re not too narrow, with tight contour lines (you might end up scrambling along steep banks or wading in the river to stay along the streambed), and avoid cliffs (D).
Keep Your Bearings
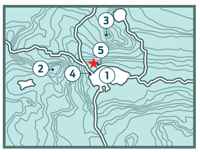
Stay on route by regularly checking your position on the map. To avoid misreading it, carefully observe your surroundings and note at least five land features before consulting the topo—such as proximity to water (1), slope angle, tree cover, aspect, and major landforms (peaks (2 and 3), inlets (4), meadows (5), etc.). If you can then identify each of those features on your map, you can be fairly confident you’ve correctly pinpointed your location (★). This is to avoid the pitfall of “making the land fit the map,” where we convince ourselves a nearby hill is a mountain, or a pond is a lake.

Plan Your Route/Keep Your Bearings | Travel Across Scree & Boulder Fields | Map Folding 101/Master Snow | Cross a River
Skate Across Scree
Talus and scree (the latter refers to smaller-size rocks) are loose rock piles that shift and slide when you walk on them. To ascend, kick steps into the rubble and switchback your way up, gathering your group at the end of each switchback to avoid traveling above others. To descend, head straight down, kicking your heels in a plunge step. Travel side by side, and if you kick off a stone, yell “Rock!”
Cruise Over Boulder Fields
Common around lakes and beneath mountain slopes, boulder fields are fun to move across once you gain confidence. Stop and assess your “line” across the boulders. Look for flat, smaller boulders, and seek the most level terrain. Walk slowly but smoothly, and avoid jumping. For better balance, don’t walk with anything in your hands, including poles. Rocks can move, so avoid fully weighting one until you’re sure it’s stable; be careful not to step in between boulders where your foot can get pinned.
Plan Your Route/Keep Your Bearings | Travel Across Scree & Boulder Fields | Map Folding 101/Master Snow | Cross a River
Map Folding 101
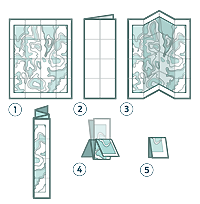
During cross-country travel, you’ll repeatedly be folding, unfolding, and refolding your map—a tricky skill, especially with a new quad with no fold lines. Here’s how to avoid a crumpled mess: Lay the map on a flat surface (1), and fold it lengthwise in half with the printed side facing in (2). Fold these halves back on themselves so the printed side faces out (3). The map should now be folded into quarters lengthwise. Find the map name. Bend the folded map in half again so the name is hidden on the inside (4). Fold the two ends back on themselves, ending up with a small square with the map name facing out (5).

Master Snow
>> In the winter and early spring, use snowshoes to avoid postholing. In late spring the few snow patches might not merit schlepping snowshoes. Walk along the typically shallow edges or shady, firm spots. >> Summer snow is harder in the morning. Angle upward, kicking your uphill boot into the snow to create a platform at least half a foot length. Swing from the knee for momentum. On steeper, softer slopes, face forward and kick straight in, ascending the snow like a ladder. >> To descend, face out and “plunge step.” Kick your heels deeply into the snow, and lean forward slightly, knees flexed. For glissading and self-arrest tips, see backpacker.com/snowtravel.
Plan Your Route/Keep Your Bearings | Travel Across Scree & Boulder Fields | Map Folding 101/Master Snow | Cross a River
Scout
River Crossings
Before you plunge into a river blindly, investigate all potential crossings. Ideally, you want a place where the river spreads out (like in a meadow), the current is gentler, and there are no downstream hazards, such as overhanging branches or rapids. Factors to consider:
>> Water depth and speed Rapidly moving water above knee-height is enough to knock most people over. Toss a rock into the current; if it moves downstream before sinking, the current is too strong to safely cross.
>> Water temperature Cold water numbs your feet, saps your strength, and can lead to hypothermia. Unless the water’s mild and gentle, don’t cross in bare feet. Bring extra socks to change into, and take time to warm up after you cross.
>> Distance across For wide rivers, plan your route to cross as high upstream as possible, so you’re above river junctions. The more tributaries you traverse, the less volume you’ll encounter in any given channel. This is also the case with braided rivers.
>> Entry and exit points It does you no good to have the perfect crossing if it leads to a steep, muddy bank with no way out.
>> The river bottom Riverbed rocks can be slippery and treacherous and can even trap a foot. Make sure you cross in boots or sturdy shoes to stabilize your foot placements.
>> Hazards Strainers are downed trees or overhanging branches that create deadly traps for swimmers. Water moves under and through them and can pin you. Avoid strainers at all costs. If you fall and are floating toward a downed tree, swim directly at it, and use your momentum to climb atop. Also watch for obstacles, like logs, floating downriver.
Ford a River
>> Remove rain pants and anything that can catch the current. Tie loose gaiter straps or shoelaces. Unbuckle your hipbelt and sternum straps, so you’re not anchored to your pack if you fall.
>> Angle slightly upstream as you cross. Use a stick for a third contact point. Move one foot, the other, then the stick, one at a time. Sidestep across, shuffling rather than crossing your feet, to maximize balance.
>> Don’t stare at the mesmerizing current.
>> If in a group, hold hands or link arms for stability. Place the largest team member in front of a line to form a human eddy.
>> If a fall’s likely, position a spotter downstream to help your buddy to shore.
Stay Upright in Whitewater
Watch how to ford wilderness rivers safely at backpacker.com/rivercrossing.