The Manual: Plan a Trip with GPS
Learn how to plot your own digital adventures with precision--then print the maps and prep your GPS.
Why use a computer and a Global Positioning System (GPS) receiver to plan, record, and share your excursions? In a nutshell: accuracy, thrift, and customization. In Using a GPS: Digital Trip Planning, Recording, and Sharing ($13, falcon.com), excerpted here, Bruce Grubbs shows you how to plot your own digital adventures with precision—then print the maps and prep your GPS.
Download a Trip
The easiest way to plan any hike (or paddling or backcountry ski trip) with GPS is to download waypoints, routes, and track data (a trail of automatically saved breadcrumbs dropped along your route) from an online trip database to your computer. You can find GPS info on several commercial sites or, better yet—shameless plug—on free sites such as backpacker.com, which has thousands of editor-approved trips. From dayhikes to long thru-hikes, from Acadia to Zion, these trips are ready for immediate navigation.
Check the File Format
Data downloaded from the Web is usually in a GPX (GPS eXchange Format) file format. Geocache data is in LOC (localizer) format, and digital maps have their own format, such as National Geographic’s TPO or DeLorme’s TPX. GPS units commonly come with software for your computer that lets you read GPX and LOC files and save them to your GPS (as well as upload files from the GPS to the computer). Need to change the format to make it compatible with your setup? Free programs, such as EasyGPS (easygps.com) and GPS Babel (gpsbabel.org), will convert between myriad GPS file formats. Tip: Use a GPS-enabled smartphone with a navigation app, like BACKPACKER GPS Trails (backpacker.com/apps), and download data directly to the phone, skipping the computer entirely.
Do a Sanity Check
Since so many sources of GPS trip data exist (some of dubious accuracy), always check on the digital map whether the route makes sense: Does it lead you over a cliff or in circles? Compare the data to other information, such as guidebook descriptions, information from rangers and hikers who’ve done the trip, and online reviews of the trip report itself.
Plot Your Own Route
GPS software does a lot more than enable digital transfers. Most programs also come with tools for plotting routes and adding symbols, waypoints, and text notes. You can measure distances and directions, too. Here are the key steps:

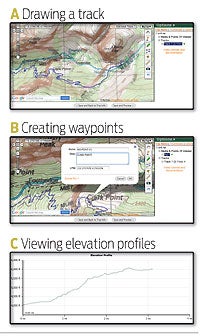
>> Craft your path (A) With digital maps, create a new route and add waypoints to it by selecting the waypoint tool and clicking on the map. Put in as many waypoints as you need to follow the twists and turns of the trail. Be sure to put a waypoint at every key spot, such as trail junctions, springs, campsites, and any other points of interest. Tip: For loop trips, place an ending waypoint next to the starting point, rather than using the same waypoint, which can confuse the GPS receiver.
>> Name waypoints and routes (B) Although the program names each waypoint automatically, applying a sequence like 001, 002, 003, etc., add a descriptive name, within the limitations of your GPS, such as “trailhead.” It’ll be easier to use the waypoints in the field.
>> Create an elevation profile (C) Most mapping programs allow you to plot a graph of your route depicting how the elevation varies with distance. Typically you do this by right-clicking the route line. Mileage is shown along the profile, which lets you see where the long climbs and steep descents are located.
Print the Map
On your trip, always carry a printout of your digital map, ideally one using the UTM (Universal Transverse Mercator) coordinate “grid” system. The grid is made up entirely of one-kilometer squares (versus the varying distances of latitude/longitude lines). This makes it easier to enter waypoints using the map (or to plot them) in the field. Also, make sure your GPS is synced with the map datum of the printed map. The most common datums are NAD27, NAD83, and WGS84. Favorite map-printing site: MyTopo.com. This service creates seamless, waterproof maps sized and centered to reduce the need to carry multiple maps. MyTopo is also synced with the trips offered at backpacker.com/hikes.
Upload to Your GPS
Once you have your trip plotted, it’s time to upload it to your GPS receiver: >> First, connect the receiver to your computer with a USB cable and turn it on. >> If you’re using software that didn’t come with your GPS unit, use its GPS setup feature to tell the mapping program your GPS brand and model, as well as the connection type. >> Use the “export to GPS” function to send the data to the GPS.