Shoot Like a Pro: Landscapes – Wide Angle, Zoom, & Macro
Whether you're shooting wide angle or on zoom, learn how to best capture the beautiful scenery around you.

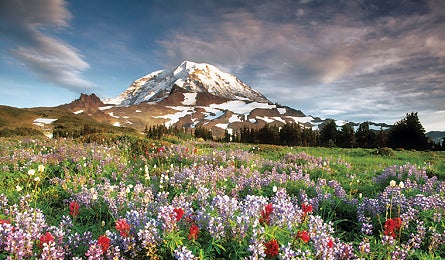
(Photo by Jon Cornforth)

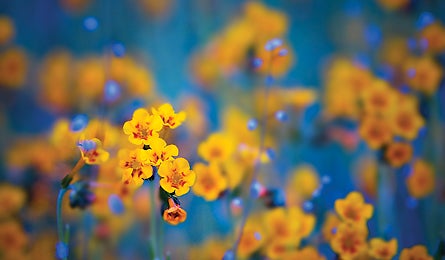
(Photo by Tomas Kaspar)
Shoot Like a Pro: Cameras | Photo Editing Software | Exposure | Wildlife | Night | Action | Summits | Portraits | When to Shoot What | Landscapes – Water & Snow | Landscapes – Wide Angle, Zoom, & Macro | Composition | Photo Survival Guide | Shoot Like a Pro: Editing Digital Photos
Wide Angle
The inspiring scenes you see in this magazine? Chances are they were taken with a wide-angle lens (14-24mm). Shorter focal lengths keep subjects tiny against a grand landscape. “You convey a sense of place with wide-angle shots,” says photographer Jon Cornforth. “You give somebody the feeling that he’s standing there.” Here’s how to get them.
» Include an interesting foreground object, then get close—set the camera within two feet of flowers or rocks.
» Shoot at the highest f/stop possible (f/11 to f/22) to increase your depth of field. “This lets you shoot from three feet away to infinity, and everything will be in focus,” says Cornforth.
» Tiny apertures require slower shutter speeds, so a tripod is essential for a crisp image. To prevent blur from a shaky trigger finger, use a cable release or the self-timer delay; both keep your hands off the camera.
Zoom
Longer lenses also make for striking landscape shots because they compress the scene, making background peaks look more imposing—as if they’re rising right behind your subject (see photo at left). Use a 70-200mm telephoto lens with an SLR. (Using a point-and-shoot? Get crisper photos with an optical—not digital—zoom of at least 10x.) Also, remember that small slices of the landscape can make for unforgettable photos—think a moonrise over a ridge or a rainbow plunging into a distant canyon. Zoom in to grab the details.
PRO TIP: TAKE YOUR TIME
One of the biggest mistakes made by amateur landscape photographers? Shooting too quickly, says pro Tomas Kaspar. When you find a vista that grabs you, take a moment to look through your camera to find the perfect angle. “What you see in the viewfinder is different from what your eye sees,” says Kaspar. Scout for a shot with the perfect foreground, beautiful light, and no distracting branches or other features. “It shouldn’t be point-and-shoot; it should be point-look-and-shoot.”
Macro
Detail shots of blossoms, lizards, and bugs add variety to your slideshow. Emphasize the subject with a shallow depth of field that keeps the object in focus while artfully blurring the background. » Choose subjects carefully. Close-ups emphasize flaws as well as beauty, so hunt for the brightest flower in the bunch.
» Set your point-and-shoot to macro mode, which will make the depth of field smaller, and focus to within an inch of the lens. Or use an aperture between f/4 and f/8.
» Shoot macros on cloudy or foggy days, when diffused light erases harsh shadows and brings out tiny details. Even better: Use a polarizing filter to reduce glare. But skip close-ups when wind moves your subject around—unless you’re after a blurry foreground and background.
» Dark shadows on your subject? Pro fix: Use a portable diffuser to soften the light. Easier: Fill in shadows with a reflector made from a white piece of paper, shirt, or piece of foil. Easiest: Use your fill flash (dial it down one or two stops).