Rip & Equip: Sleeping Bags
Mummy or semi-rectangular? Sleeves vs. clips? Choose the right sleeping bag and keep it in top shape with these tips.
Shop Smart | Ratings and Fill | Care Instructions
Shop Smart
Ask yourself five key questions before buying a new sack.
1. How warm? Determine the lowest temperature you expect to encounter while camping—then subtract up to 10 degrees for insurance. (See EN ratings, below right.) Be realistic: Do you tend to sleep hot or cold? Is your pad a deluxe, well-insulated mattress or a minimalist model that’s only an inch or so thick?
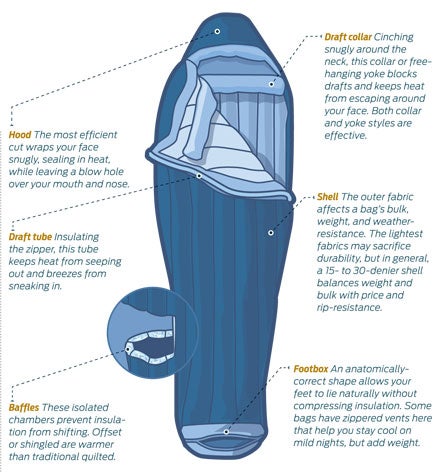
2. What type of fill? Two choices: down or synthetic. Down offers superior compressibility, warmth-to-weight ratio, and long-term loft, but unless it’s paired with a highly water-resistant shell, down is a bad choice for damp conditions. Synthetic bags insulate better when wet and, especially for entry-level models, usually cost less, but specific performance characteristics are associated with filament type. Better warmth-to-weight ratios, compressibility, and durability add cost to bags of both types.
3. How roomy and how long? A mummy bag’s tapered, snug cut enhances heat-trapping efficiency, but can be uncomfortably tight for large or restless sleepers. A semi-rectangular shape offers more roll-around room, but increases weight and bulk. Beware of a too-tight fit: compressing insulation causes cold spots. Most bags come in several lengths (excess space at your feet means excess weight, but the benefit of added storage space), as well as women’s-specific models (which have different proportions and extra insulation).

4. What features? Zippers vary from full-length (great for venting) to none (great for cutting weight). Do you need a stash pocket for a headlamp and iPod? Brushed linings add a little weight, but are cozy and wicking.
5. Is it comfortable? Use warmth and features as a guide to narrow your list. Then crawl into the finalists and cinch the hood around your face to check for scratchy fabrics and drawcord access.
Shopping Tips
In-store
Lay all the bags you’re considering on the floor, side by side, to compare loft. Wet the bags’ shells with water (a good store will have a spray bottle on hand) to see how well it beads. After crawling in for a fit and comfort test, stow the bags in their included stuffsacks and compare compressed sizes of bags in the same weight and warmth categories.
Online
Buy in the off-season: Summer bags are cheaper in January, while winter bags cost less in July (one editor nabbed a top flight -20°F Sierra Designs bag for under $200 at steepandcheap.com). Save bucks by purchasing a lightly used bag online. Look for sales from gear-rental companies with generous return policies like LowerGear (lowergear.com) in case of a deal-breaking defect.
Shop Smart | Ratings and Fill | Care Instructions
How to Read EN Ratings
Simple is not always better. Case in point: the standardized sleeping bag temperature rating system—called EN, for European Norm 13537. At first glance, it’s more complicated than the previous temp ratings, which provided a single number, say 20°F. But our testers like EN; they think the widespread use of the system has led to more accurate ratings overall.

The key improvement: EN ratings provide a range to address the disparity in sleeping comfort between genders (women typically sleep colder) and from individual to individual based on myriad factors like body fat, tent, sleeping pad, clothing, hydration, and metabolism. EN tags list three specific temps: Comfort (the lowest comfortable sleeping temp for an adult woman), Lower Limit (the lowest comfortable temp for an adult man), and Extreme (not comfortable for anyone to sleep, but warm enough to prevent fatal hypothermia in a woman for six hours). Note: EN test dummies use a standard pad and wear baselayers and a hat.
Synthetic Fill Types
Short-staple filaments mimic down’s softness and compressibility, but sometimes clump.
Continuous-filament fills are lofty, durable, and affordable, but don’t pack as small as short-staple fibers.
Multi-denier insulation mixes fibers with different diameters to improve warmth, but they’re pricier, too.
Shop Smart | Ratings and Fill | Care Instructions
Care Instructions
Repair
>> Diminished water resistance If your shell fabric wets out—water droplets no longer bead on the surface—treat it with a spray like McNett’s ReviveX Spray-On Water Repellent, then throw the bag in a dryer on low heat for five minutes to set the finish.
>> Escaping feathers Don’t pull down out, which widens holes and will cause you to lose more fill. Push the quills back in (or pull them in from the opposite side), then massage the shell to seal the fabric.
>> Tears and holes Patch small rips with a rounded piece of nylon repair tape like McNett Tenacious Tape. Cut it at least a half inch larger than the hole on every side. Tear bigger than six inches? Send the bag to its manufacturer (or Rainy Pass Repair; rainypass.com) for a patch and down refill.
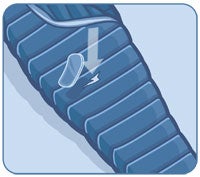
>> Snagged zipper Pull the caught fabric aside at a right angle to the slider.

Clean
Keep your bag spick-and-span to maintain warmth and water resistance. Spot clean: Mix powdered laundry detergent and water into a paste. Hold the shell away from the insulation and scrub with the paste and a small brush. Rinse and air dry. Wash: Use a mild soap like Nikwax Down Wash and a large-capacity, front-loading washer on a gentle, cold cycle. Dry it in a commercial dryer on very low heat. See a demo at backpacker.com/sleepwash.
Use and Maintain
>> Dry a wet bag in the field by hanging it in a shady, breezy spot (fully unzipped). If you need sunlight or heat to speed drying time, drape the bag in a sunny spot, but rotate it every hour or so (extended UV exposure can damage delicate fabrics).
>> Before sleeping, “bathe” yourself with wet wipes and/or change into clean clothes to keep your bag’s interior free of body oil and dirt, which impair insulation and increase stink.
>> When camping, air out your bag each day to dry sweat that can collect in the liner and insulation. Turn it inside-out and drape it on a large, shady rock or branch for 10 to 30 minutes.
>> Use a waterproof stuffsack (or line your stuffsack with a trash compactor bag).
>> Stuff, rather than roll. Stuffing is easier, and it prevents permanent creases, which may turn into cold spots. Start with the bottom of the bag to avoid trapping air in the footbox.
>> Add a liner during shoulder-season trips to add up to 15 degrees more warmth.
>> Unfurl your bag well before you go to bed so it has time to loft before you slip in to sleep.
Never Do This
>> Patch a rip with duct tape Carry nylon repair tape or a patch, like Tenacious Tape or Tear-Aid Repair Patch, in your gear kit. If duct tape is your only option, remove it as soon as you get home. You can de-gunk with Goo-Gone Spray Gel (available at hardware stores).
>> Store your bag stuffed Leaving the bag compressed for long periods of time decreases loft (ergo, warmth). Hang it in a closet or stow it in a large cotton or mesh bag.
>> Dry-clean it Harsh solvents damage loft.
>> Burrow deep into your bag Your breath’s water vapor will dampen insulation. Instead, cinch the hood around your face, leaving your mouth and nose uncovered.

Secret from the Pro
“A comfy sleeping pad is a critical complement to your bag, but sometimes the slick shells slide around, making for an uncomfortable—or cold—night’s sleep. Add friction to your sleeping pad and stay comfortably on top of it with this simple trick: Apply small dots of Seam Grip to your sleeping pad’s surface, focusing on the key points of contact: the head, shoulders, and hips. If your pad tends to slip around on your tent floor, also dot its underside. Once dried, the adhesive acts kind of like a boot sole—giving your pad traction against the slick nylon of your sleeping bag shell or sleeping surface.”
— Excerpted from BACKPACKER’s Complete Guide to Outdoor Gear Maintenance and Repair ($20, falconguides.com)
Be Kind to Your Bag
A well-maintained bag can last for years. Learn how to keep your bag in top shape and reduce wear and tear on the trail with video tips from Kristin Hostetter, gear editor and author of BACKPACKER’s Complete Guide to Outdoor Gear Maintenance and Repair, at backpacker.com/bagcare.
