Gear School: Insulation
Stay toasty with the right fill for your bag and puffy jacket.
MATERIALS | BUY, USE, FIX | TEMP RATINGS

MATERIALS | BUY, USE, FIX | TEMP RATINGS
BUY
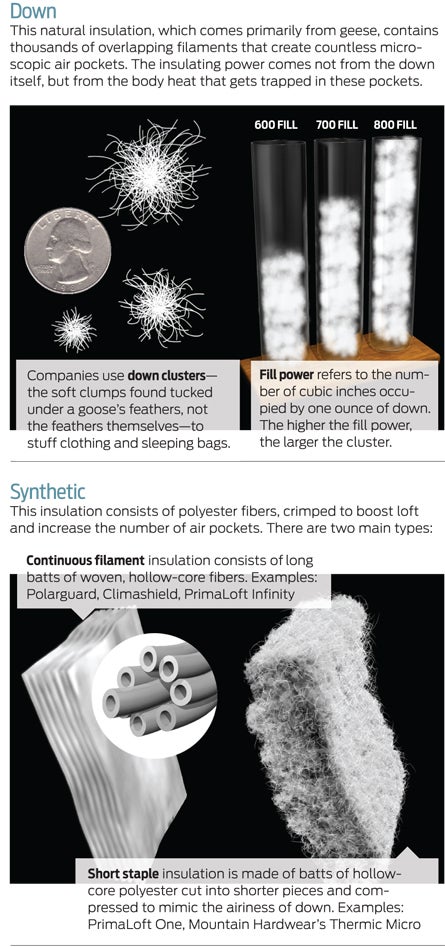
>> Down The Rolls Royce of insulation, down has by far the best warmth-to-weight ratio, the best compressibility (read: packability), and the best long-term loft and durability—a high-quality down bag will last decades. It also breathes well by allowing sweat vapor to pass through, increasing comfort in a wide range of conditions. Cons: It’s worthless when wet because down clusters—and all their air pockets—collapse if exposed to moisture. It’s also more expensive; a three-season, 800-fill down bag can cost up to $200 more than a comparable synthetic. You get what you pay for: Buy the highest fill power you can afford for the best performance and durability.
>> Synthetic This insulation is the best choice for frequently wet conditions (that’s you, Northwest). Polyester, unlike down, is hydrophobic. Translation: When it gets wet, the water slides between the fibers, not inside them, which means the fill maintains loft and a higher degree of warmth. Synthetics also dry faster and cost quite a bit less than down, but they’re bulkier and heavier for the warmth. Continuous filament fill won’t fall apart when stretched or clump up when stuffed, but it’s the heaviest, least compressible option. Short staple fill is loftier and more packable, but not as durable.
USE
>> Keep it clean. Wear a clean set of layers to bed—not the day’s hiking clothes or your birthday suit—to prevent contaminating your bag’s liner with grit and sweat. You’ll have to wash it less often, which lengthens your bag’s life by avoiding unnecessary wear and tear on the shell, zipper, and fill.
>> Air out your bag. Body moisture builds up inside the insulation overnight, especially in colder temps. Turn your bag inside out and drape it over a rock or branch in the sun while you pack up each morning.
>> Store it right. On the trail, protect your bag and puffy jacket from the elements in waterproof stuffsacks or trash compactor bags. Back at home, keep your bag’s loft alive by storing it loosely in a big cotton sack, hanging it in your closet, or laying it under your bed.
>> Lighten your load. To save money and weight, wear your puffy jacket (plus a hat and booties) to bed. You’ll be able to get away with a smaller, lighter bag rated up to 15 degrees higher than nighttime lows.
FIX
>> Spot-clean Surface stain? Rub it clean with a toothbrush and a paste of powder laundry detergent and water. Rinse well and air-dry.
>> Wash Dirt and oil can seep into the down and decrease loft. When the bag smells funky, looks dark or grimy, or has lost noticeable loft (after about 20 or 30 nights of use), it’s time for a wash. Use a front-loading machine, run it through extra rinse and spin cycles, and dry thoroughly on low with a few clean tennis balls to break up clumps.
>> Restore Even the best bags will sometimes lose a few feathers. But if yours has lost enough fluff to reduce its warmth, send it back to the manufacturer (some will restuff for a nominal fee) or to Rainy Pass Repairs (rainypass.com) for restuffing ($37 and up).
Laundry Lesson
Editor-in-Chief Jonathon Dorn leads you through the steps of washing a sleeping bag at backpacker.com/sleepwash
MATERIALS | BUY, USE, FIX | TEMP RATINGS
The Ratings Game
Problem: Two 20°F bags from different brands may not be equally warm.
Solution: A new standardized system from Europe, called EN13537, that makes ratings consistent. The standard relies on independent labs that test bags using a heated copper mannequin and 20 thermal sensors. REI and Marmot currently use this system, with more companies expected to follow.
Behind the Scenes
Read our in-depth report on EN13537–and learn to decode the ratings–at backpacker.com/ratingsgame.
