Gear School: Four-Season Tents
Camp comfortably this winter with a shelter built for foul, windy weather.

BUY
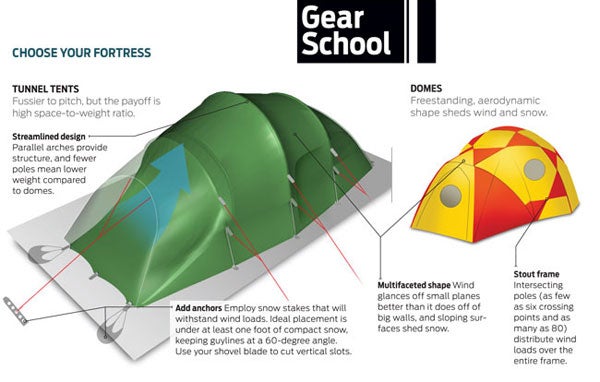
>> Shape: Non-freestanding tunnel tents are often lighter than domes and are roomy for the weight, but winter-ready hoop structures need anchors to stay upright on both rock and snow. When there’s no snow, they’re trickier to set up than freestanding domes, which pitch quickly. But multi-pole dome frames can be complex—a downside for foul-weather setup. Both designs (see above) shed wind, but domes add weighty structure to remain rigid against it, while streamlined tunnels absorb it and bounce back. Winter tents use larger-diameter aluminum poles (10 millimeters versus 8.5 for most three-season models), which add strength, but are still relatively light, and retain flexibility in extreme cold. Because of stronger, weightier materials, winter tents can easily weigh twice as much as similarly sized three-season models.
>> Walls: Single-wall tents use one layer of waterproof/breathable fabric (instead of a fly and canopy), which saves weight. But condensation can be a problem; look for good vent options. Double-wall models have a waterproof fly that protects a breathable inner canopy. The inner wall transfers moisture better and is protected, so it can have vents, which keeps condensation to a minimum. With some double-walls, the two layers are joined and the poles attach to the fly, which speeds pitching and keeps the interior dry during a stormy setup.
>> Vents: Closeable vents are located at the tent’s crown (rather than at the doors or on the sides, as in many three-season models) because warm breath rises more readily in cold temps. Apex openings allow steamy air to escape before condensing and freezing on tent walls. Mesh is used sparingly (if at all) in winter shelters because it doesn’t insulate well and must be paired with weighty zippered flaps to seal out snow that blows under the fly.
>> Interior space: Small models (30 square feet for two campers) are warmer, but bulky gear or bad weather may make you wish for more space. A roomy vestibule provides extra space for gear and cooking.
>> Fabrics: Instead of 15- or 20-denier nylon (which is light but absorbs water) used in summer tents, many winter shelters utilize denser, hydrophobic 70-denier polyester. Look for bright colors and reflective elements on the fly and guylines, which increase visibility in whiteouts.
USE
>> Fix the windward corner first. Then secure the other corners before attaching poles. Point the most aerodynamic end into the wind, which helps orient the fabric during setup and reduces wind loads.
>> Guy the tent out fully. Heavy-weather tents often have a dozen or more guylines, compared to six to eight in standard three-season designs. Use them, even when winds appear calm, so sudden weather changes don’t disrupt your sleep or destroy the tent.
>> Use snow anchors. For secure staking in snow, use snow stakes (MSR’s Blizzard Tent Stakes, $5, msrgear.com). Improvise with sticks, skis, or buried snow-filled stuffsacks (see above).
>> Remove snow. At the first sign of sagging, use your arm or a tool with no slicing edges (not axes or shovels) to brush off snow. To avoid dangerous carbon monoxide buildup (from cooking in the vestibule), regularly clear snow from the fly’s base and around vents.
>> Reduce condensation. Brush all snow and ice off of your gear before entering the tent; open the vestibule door and close the interior door as much as possible when cooking near the tent; open vents at night.
FIX
>> Poles: If a pole snaps due to wind or snow loads, repair it with the pole sleeve (a short, larger-diameter segment included with pole sets). Slip the sleeve over the break and tape it in place.
>> Seams: Over time, wind vibrations stress stitching and can damage polyurethane coatings, compromising waterproofing. Use Seam Grip ($7, 1 oz.; mcnett.com) to reinforce wear points and repair tears.
Text by Kelly Bastone; Illustration by Don Foley
